¶ All Projects
¶ As a Client, Tester or Analyst
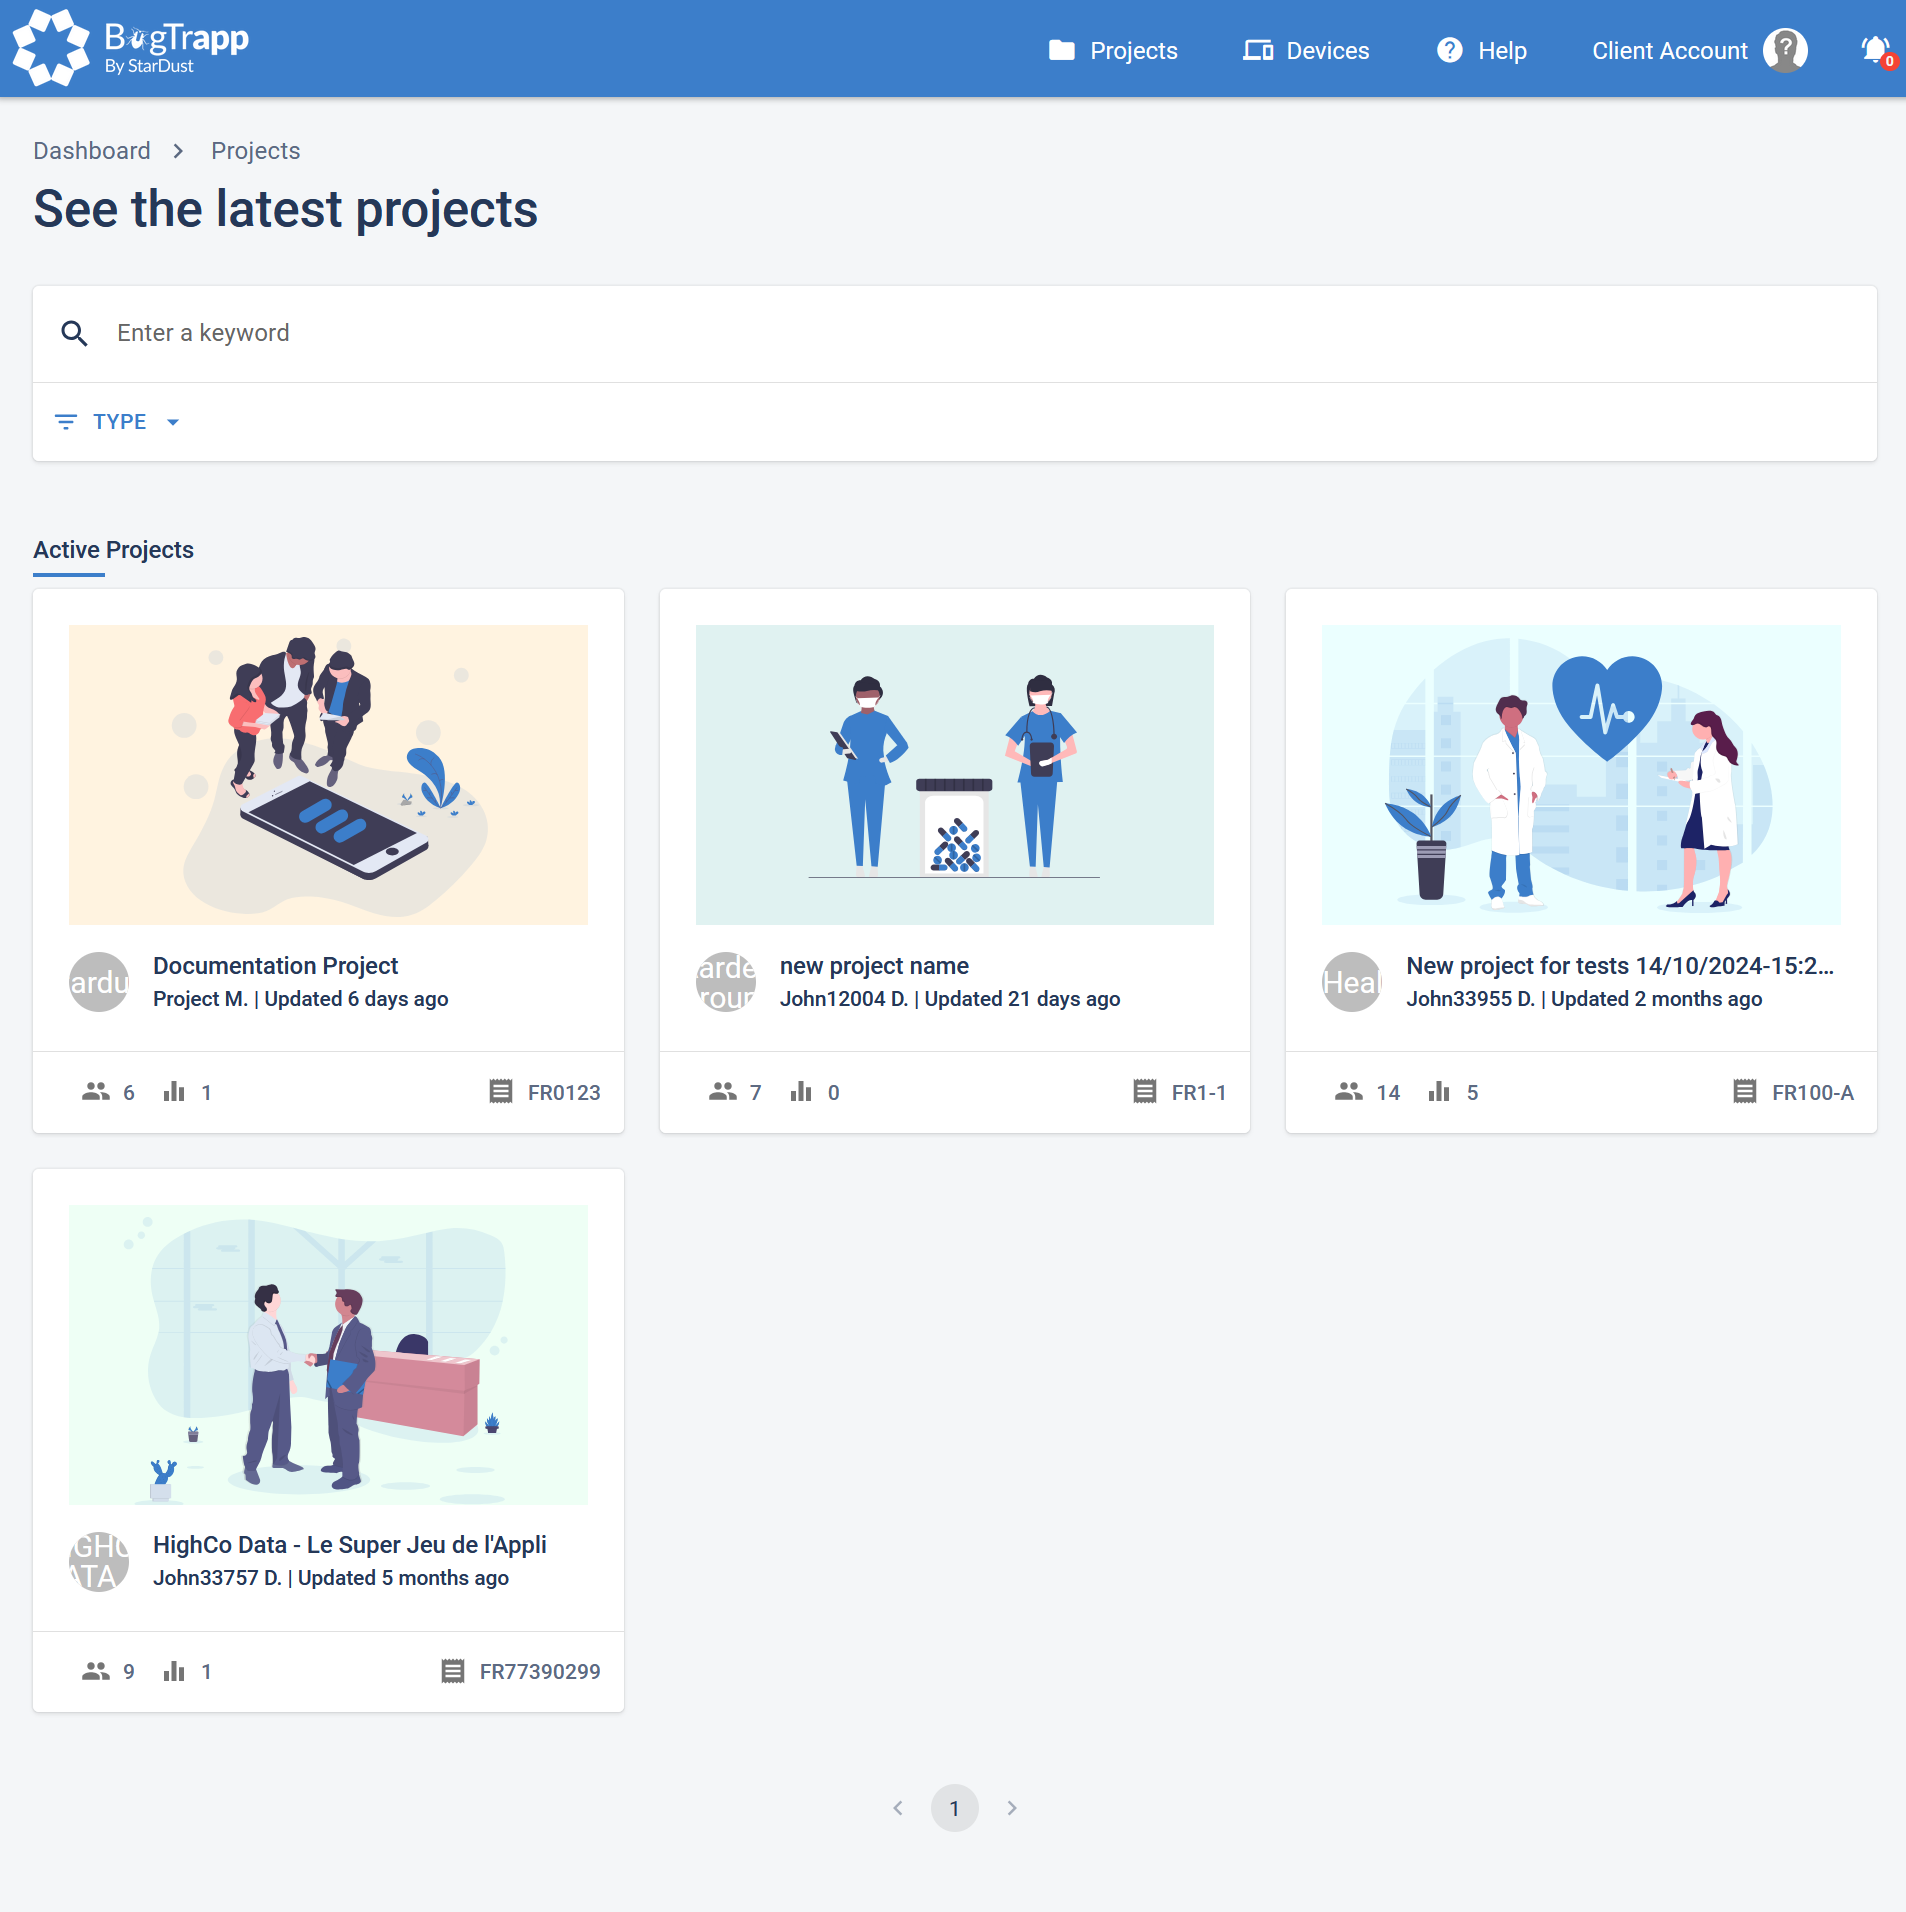
On the All Projects page, you will find the list of projects to which you are assigned.
You can use the search field to find a specific project.
You can use the "Type" filter to filter the projects displayed on this page based on their type (Web, IOT or App).
Each project is represented by a card containing :
- A visual representing the client's business
- The client's logo
- The name of the client and the name of the project
- The name of the PM
- The latest date the project was updated
- The number of users assigned to the project.
- The number of campaigns contained in this project
- The opportunity number of the project
Click on a project name to see its details.
(→ Projects Details).
¶ As a PM
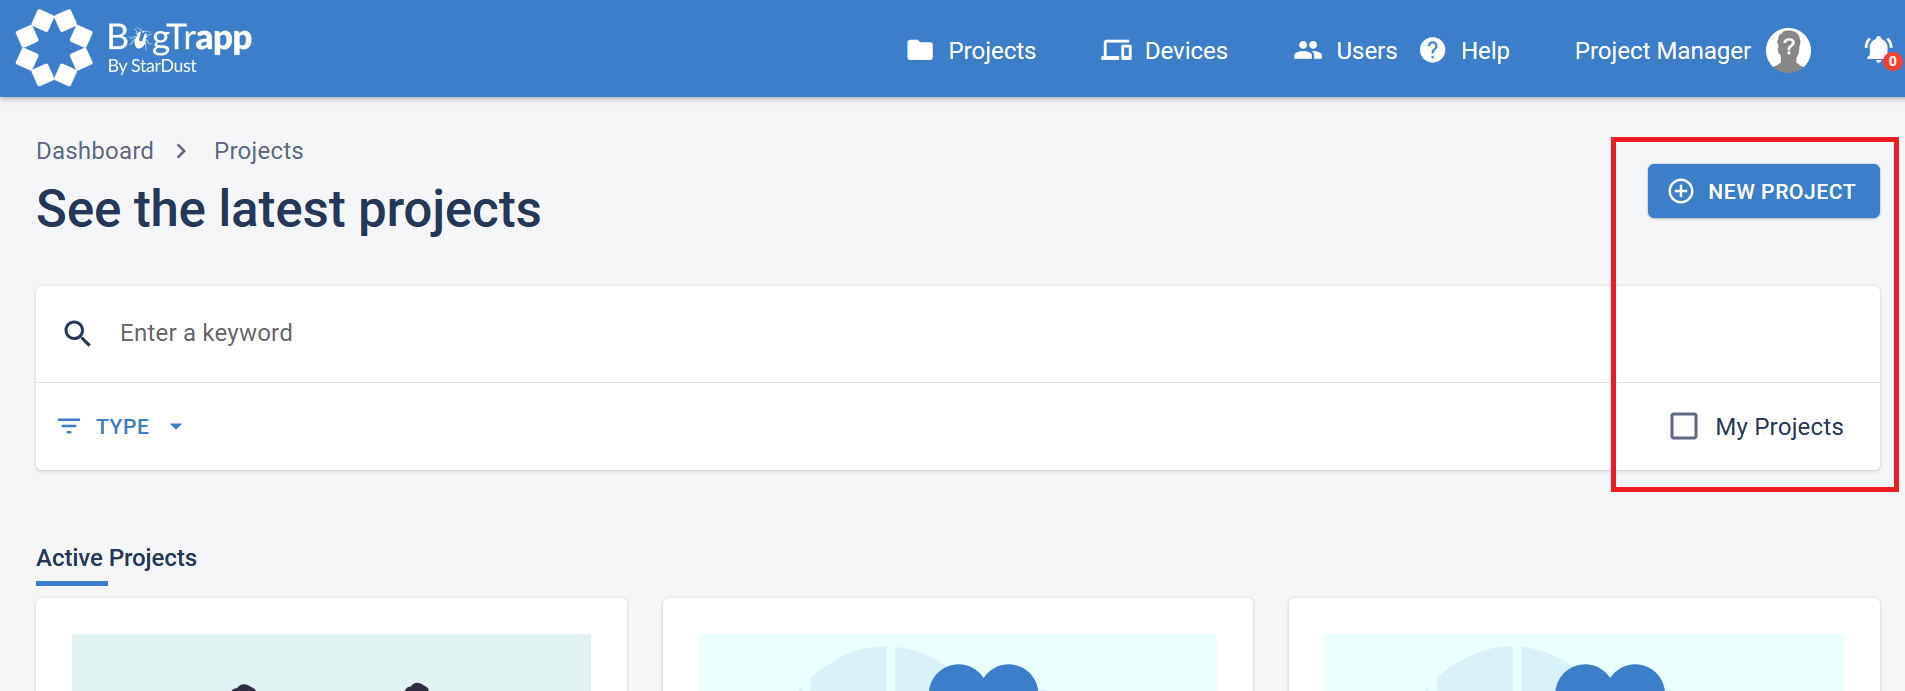
The PM role gives you access to the following additional information and actions:
- "My Projects" checkbox (checked by default) to filter on the projects you are assigned to.
- NEW PROJECT button. Click on this button to open the New Project Pop-in (New Project Pop-in)
¶ New Project Pop-in
¶ As a PM
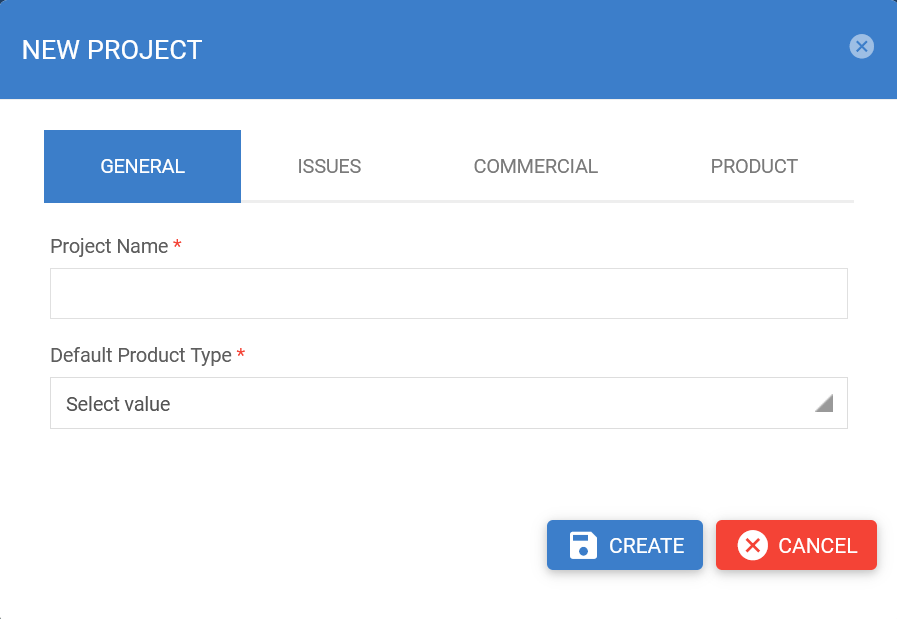
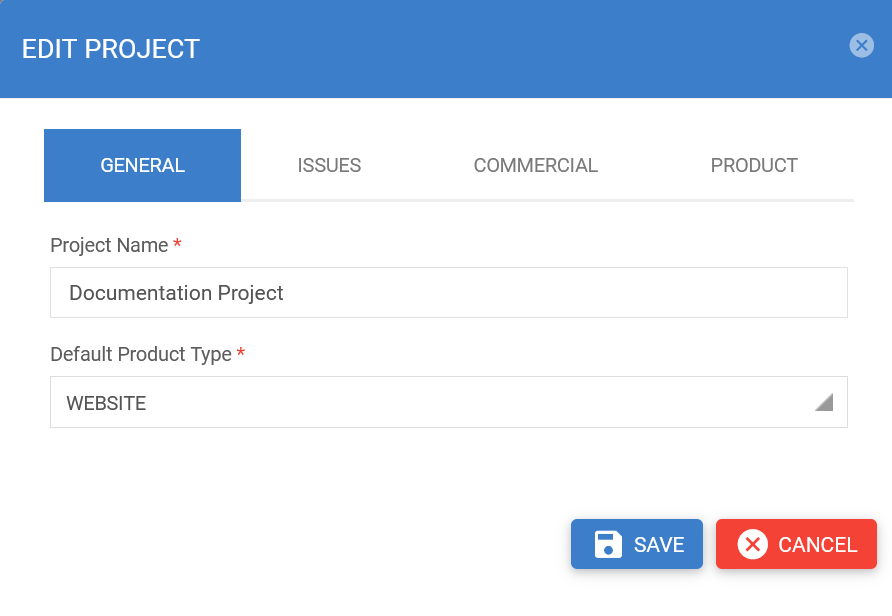
On the Popin « New Project », you will have to fill in all the required fields in order to create a new project.
GENERAL tab
Fill in the following mandatory fields:
- Project Name
- Default Product Type - chosen from the drop-down list (Website, App, iOT)
ISSUES tab
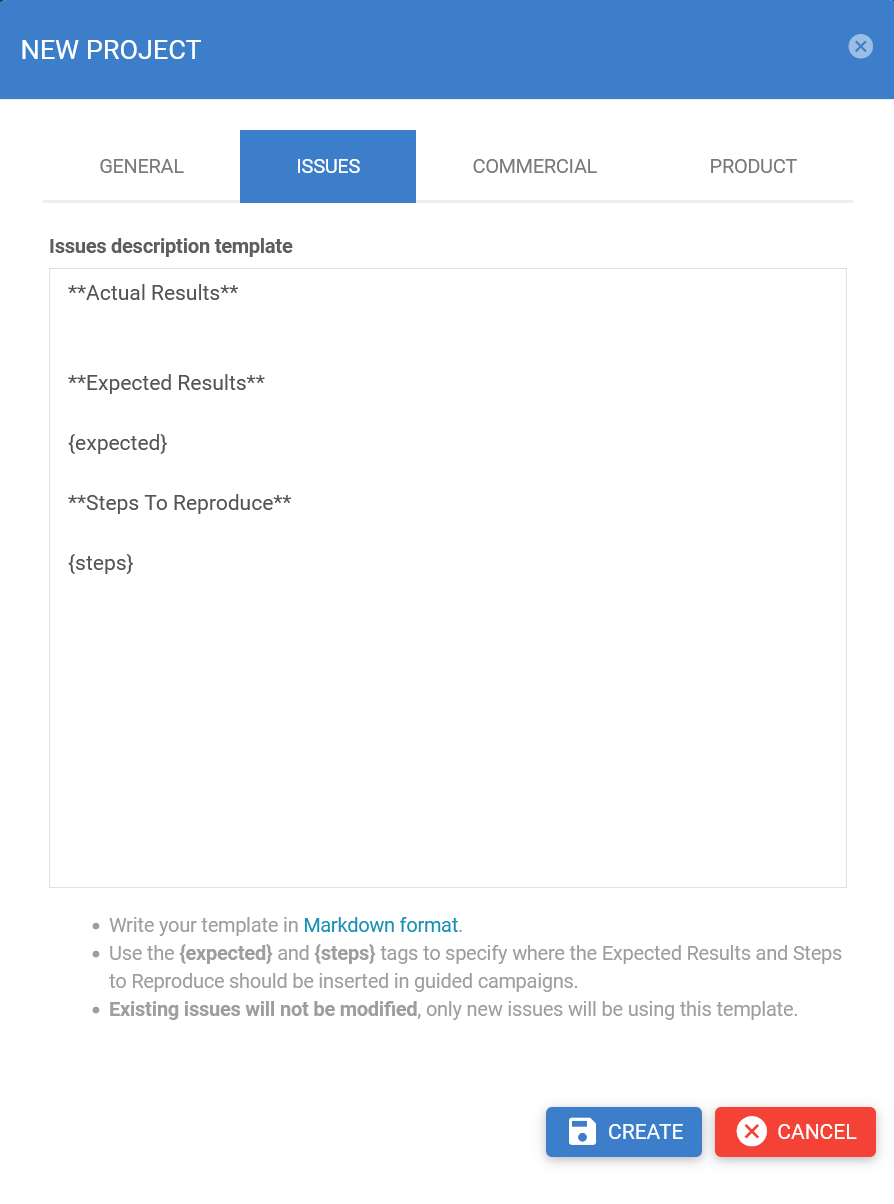
You can change here the Issues description template for all new issues in this project.
COMMERCIAL tab
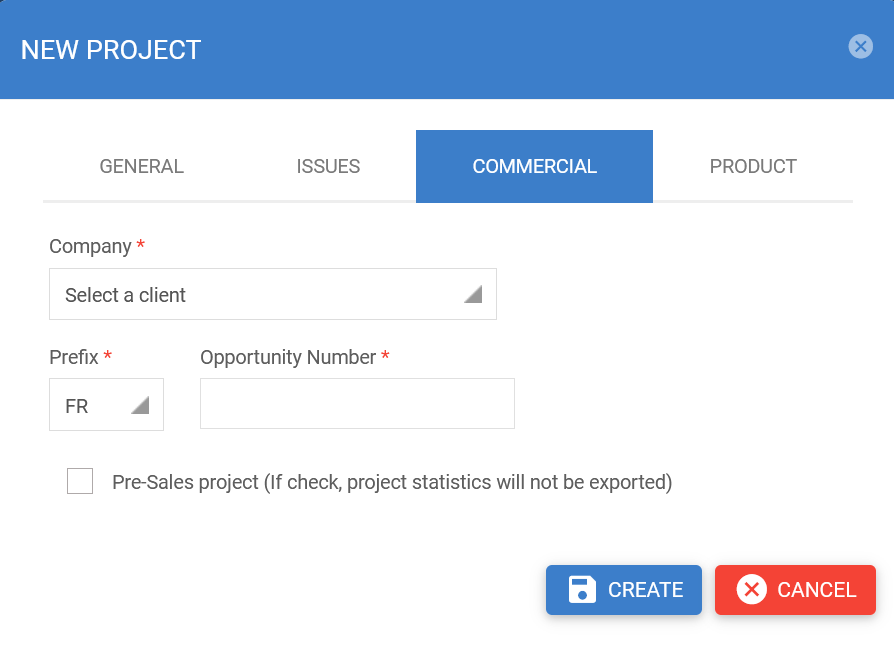
Fill in the following required fields:
- Company - choose from the drop-down list
- Prefix - choose from the drop-down list (FR, CA)
- Opportunity Number
If you want to create a pre-sales project (or if this project should not appear in the statistics), check the "Pre-Sales project" box.
PRODUCT tab
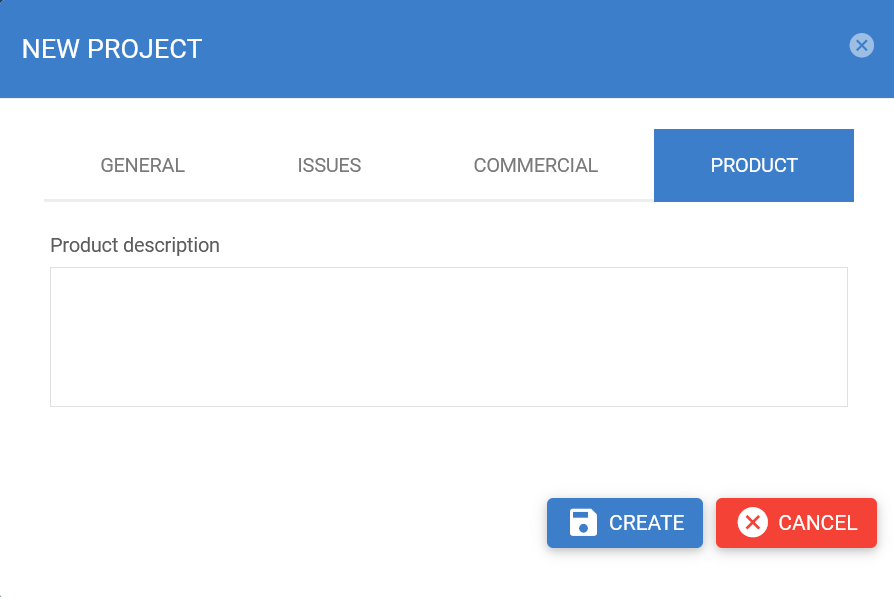
You can fill in the "Product description" optional field.
Finally click on the CREATE button to create the project (→ Projects Details) or on the CANCEL button to cancel your entry.
¶ Project Details
¶ As a Client or Tester
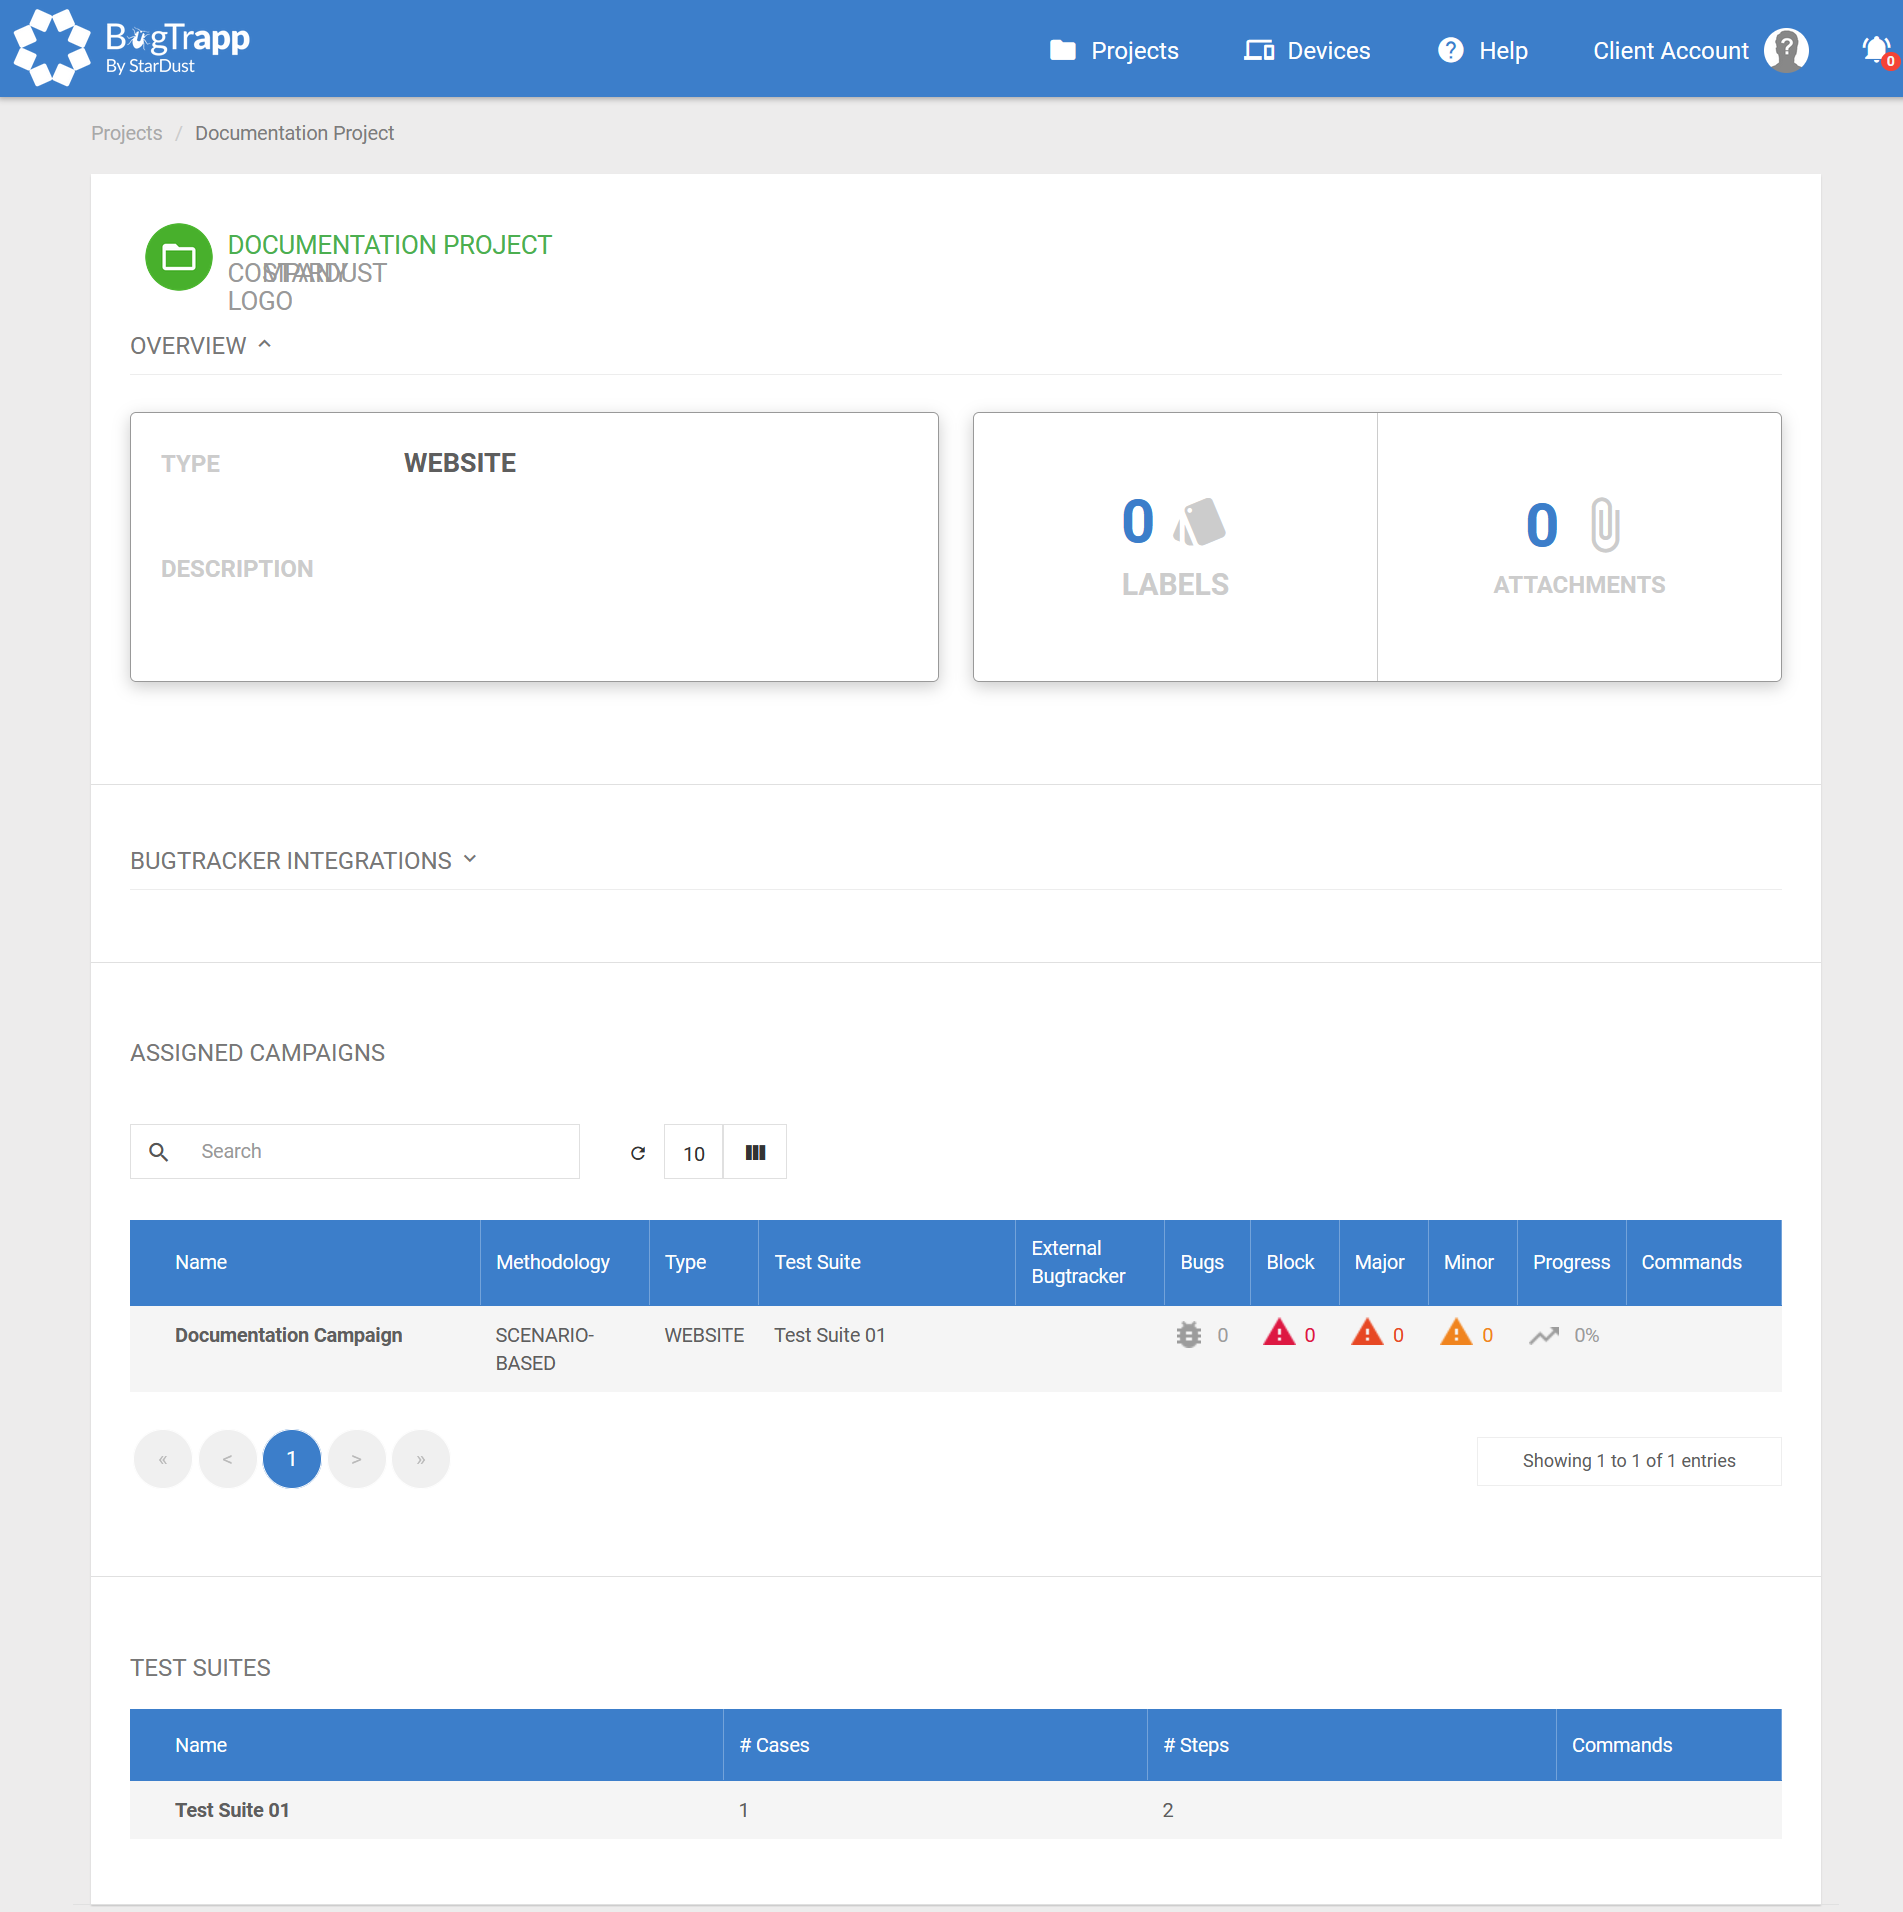
On the Project Details page, you can see the project information arranged in several blocks.
Under Overview, a summary of the project (Type and description), the labels set for issues on this project, and finally the number of attachments.
Under Bugtracker Integrations, you can view the different integrations to the client bugtracker (Jira, Redmine, Gitlab or Azure DevOps) which will allow an automatic export of bug tickets to this or these bugtracker(s).
Under Assigned Campaigns, you will find a table listing the project's campaigns with information for each of them such as the number of bug tickets, progress etc. A search field allows you to filter the list of campaigns displayed in this table. You can also change the number of campaigns displayed as well as hide/show columns.You can click on the header of a column to sort its contents in ascending/alphabetical order.
Click on the line of a campaign to display its details
(→ Campaign Details).
Under Test Suites you will find a table listing all the Test Suites associated with guided campaigns in this project. You can click on the header of a column to sort its contents in ascending/alphabetical order. Click on a Test Suite row to view its details (→ Test Suite Details).
¶ As an Analyst, PM
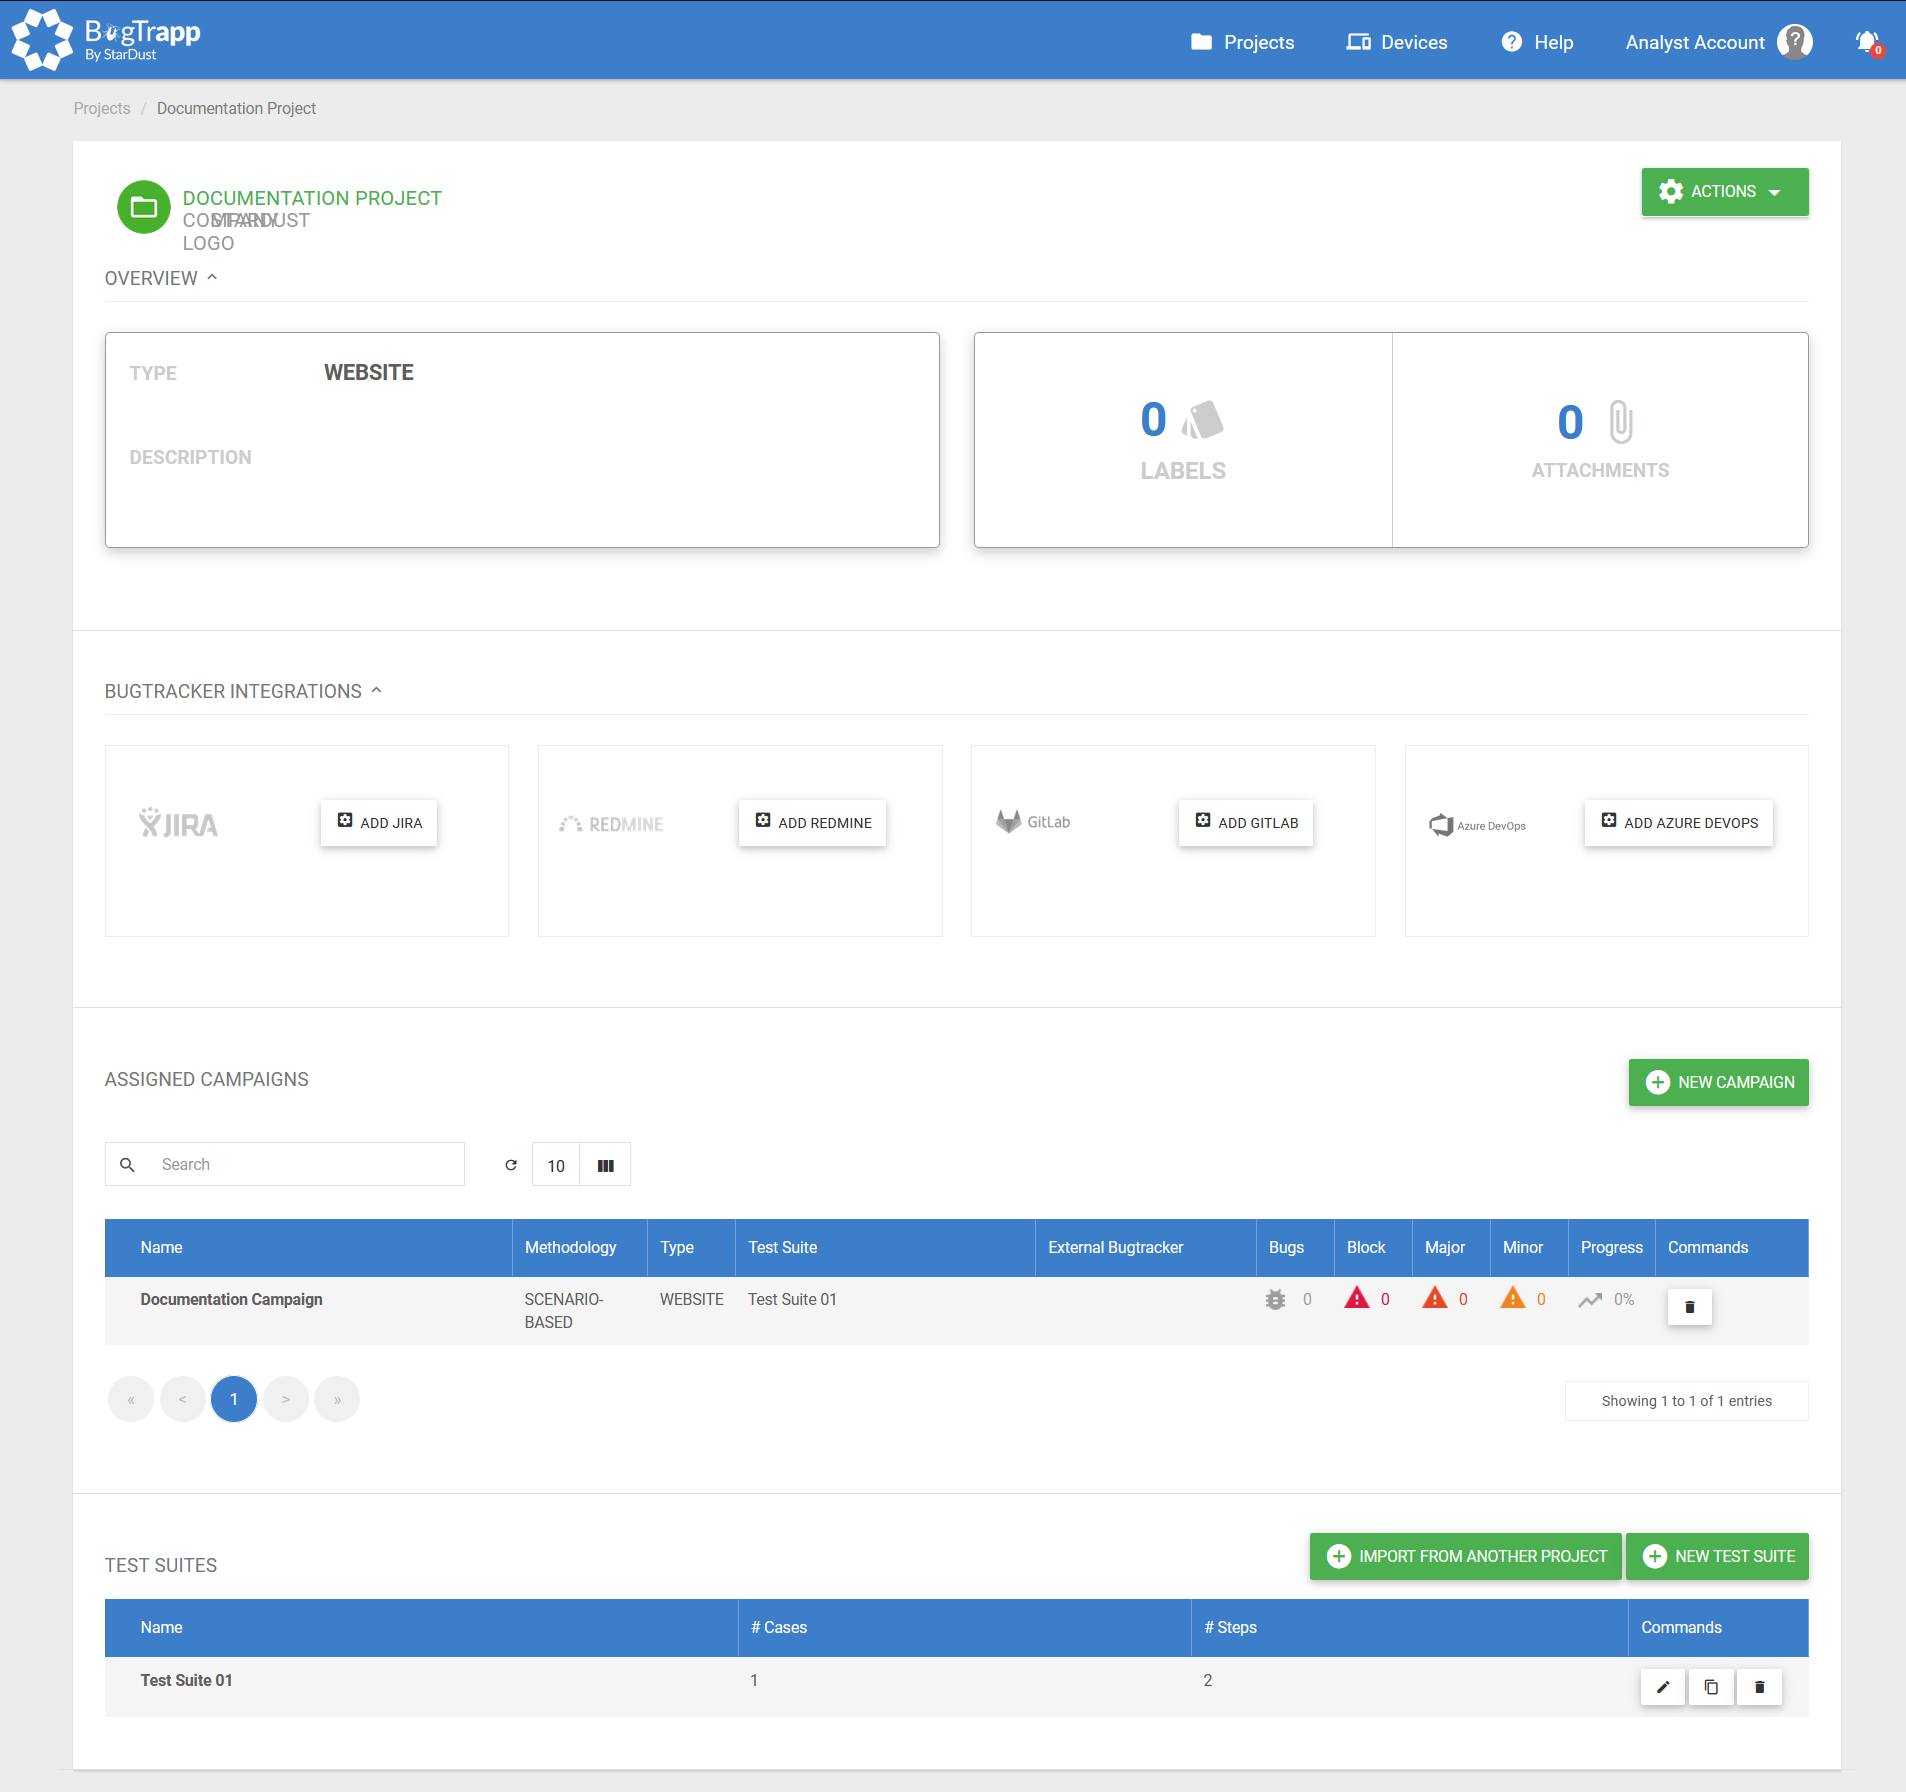
The Analyst and PM roles gives you access to the following additional information and actions:
The "ACTIONS" button allows you to access the submenu with the functions:
-
View details: opens a Pop-In window giving detailed information about the project (Project name, creator name, creation date, opportunity no.)

-
Edit Project: opens a Pop-In window allowing to edit the project data (Project name and type, company, opportunity number, description, product sections and versions etc...) classified under three tabs GENERAL, ISSUES, COMMERCIAL and PRODUCT
-
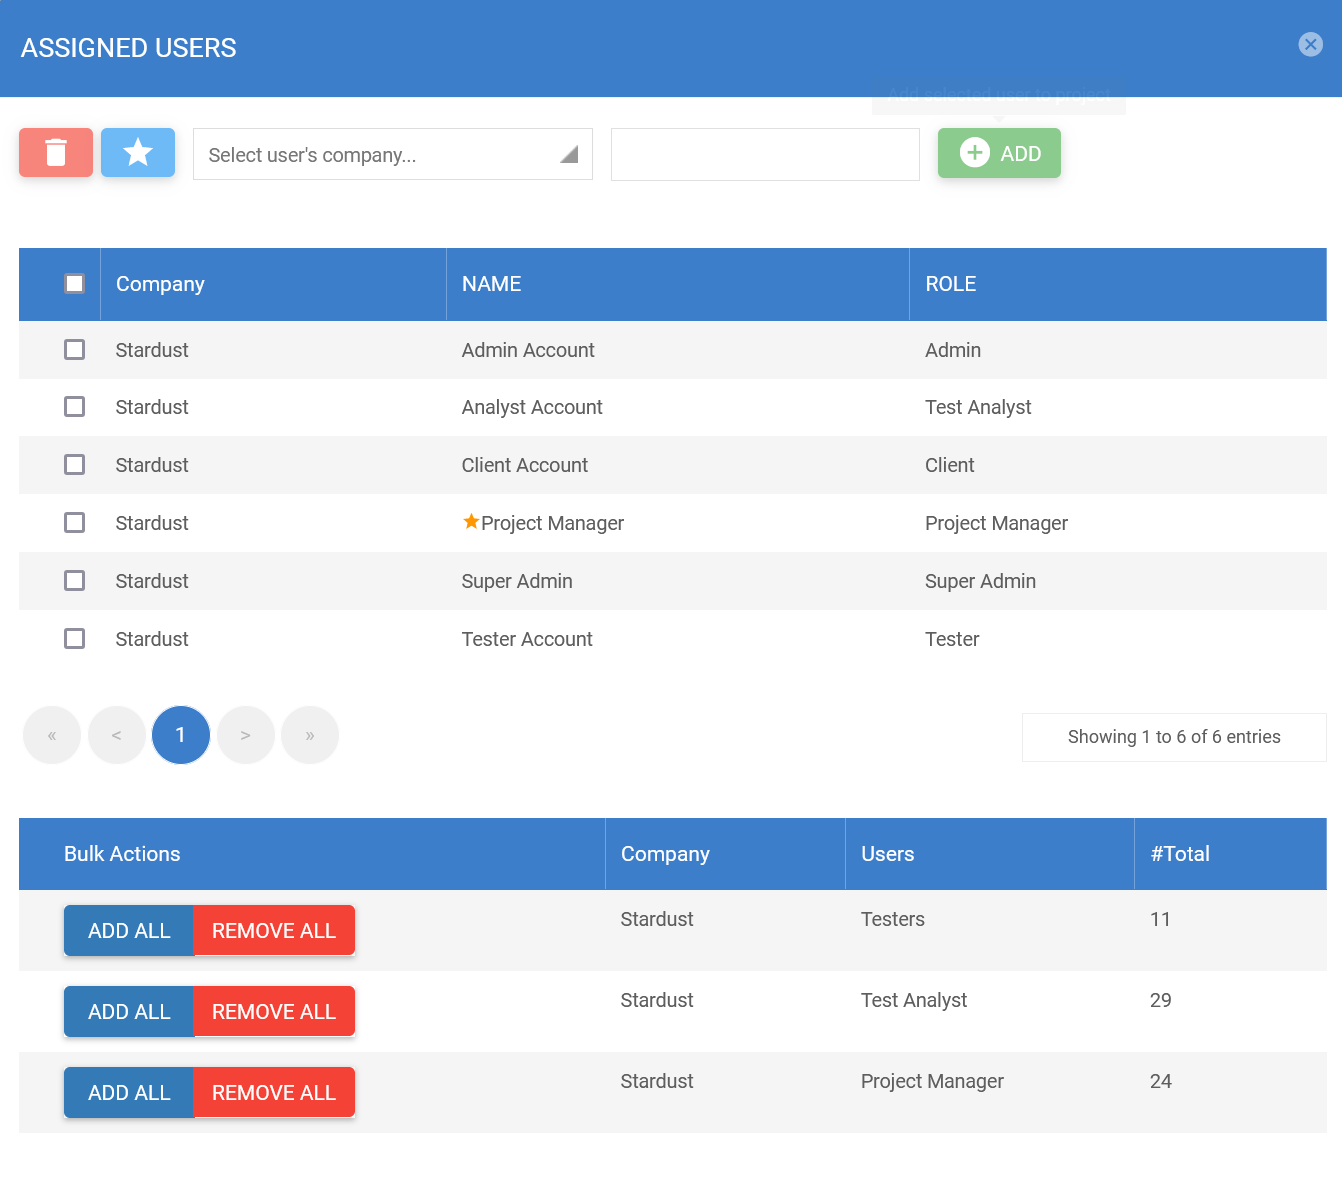
Users: opens a Pop-In window to manage the users associated with this project
-
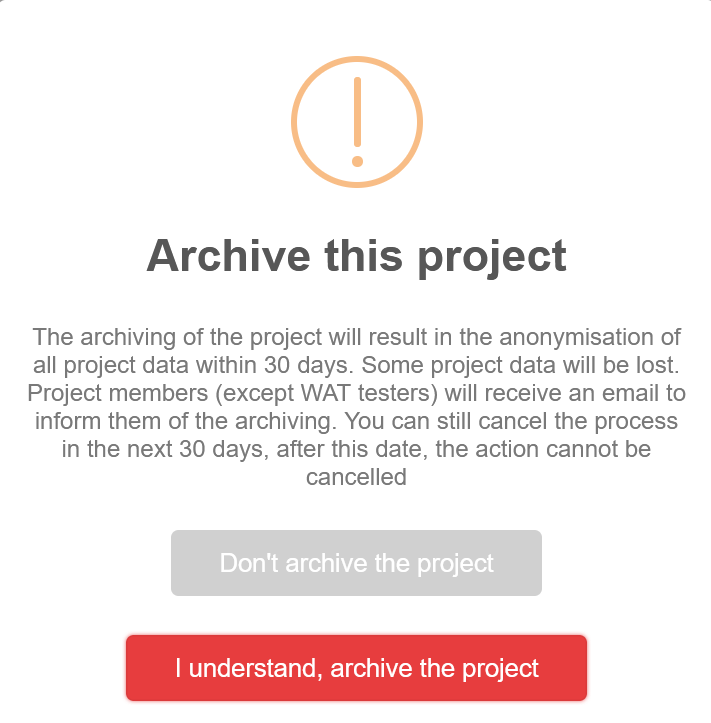
Archive: allows you to archive the project so that it no longer appears in the list of projects. A confirmation Pop-In window appears before the project is actually archived. Once archived, you can unarchive it by repeating the same action in the submenu. For more details on archiving, see the tips for PM (→ Tips for PM)
-
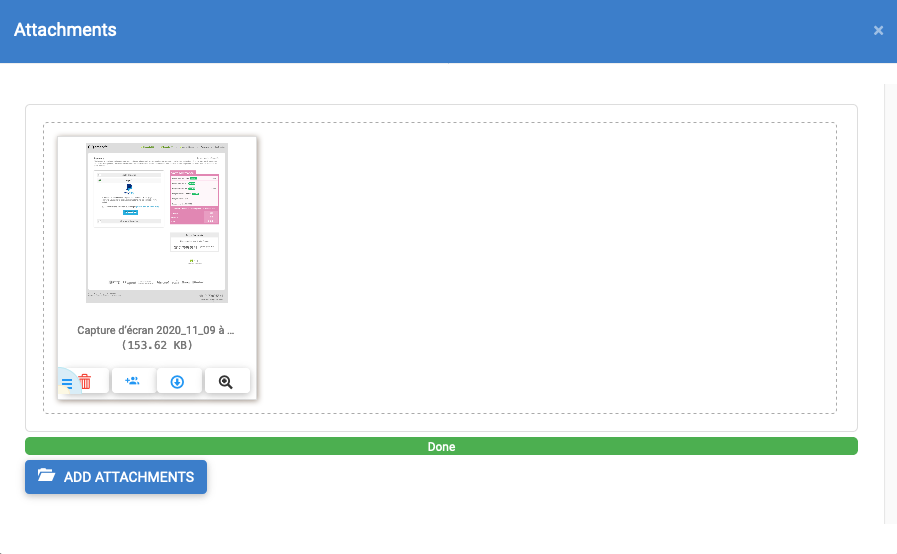
Attachments: opens a Pop-In window to manage files attached to the project (such as SFD, storyboard, screenshots etc...). You can add, delete, download and view an attachment.
Under BUGTRACKER INTEGRATIONS you will find the four bugtracker integration options that are compatible with BugTrapp: JIRA, REDMINE, GITLAB and AZURE DEVOPS.
Click on the button corresponding to the BugTracker you wish to integrate to open the configuration pop-up window.
- Step 1: Configure the client BugTracker instance by giving it a name, then by entering its base URL and the login and password provided by the client. Click on the TEST CONNECTION button to make sure that the information entered is correct. It may happen that the Bugtracker needs a token instead of a password, in this case create one on the client Bugtracker and fill it in the password field
- Step 2: choose the project in which you will export the bugs. Select the type of ticket (this will usually be Bug). Finally choose the format used in the text fields of the client bugtracker (Markdown, html or text). Click on the NEXT button when finished.
- Step3: this last step is the most delicate, you have to match the fields of Jira and Bugtrapp and their values.
Under Assigned Campaigns, a delete button for each campaign allows you to delete it (be careful this action is irreversible).
The NEW CAMPAIGN button allows you to create a new campaign associated with this project. Click on the button to bring up the Pop-In window for editing a new campaign.
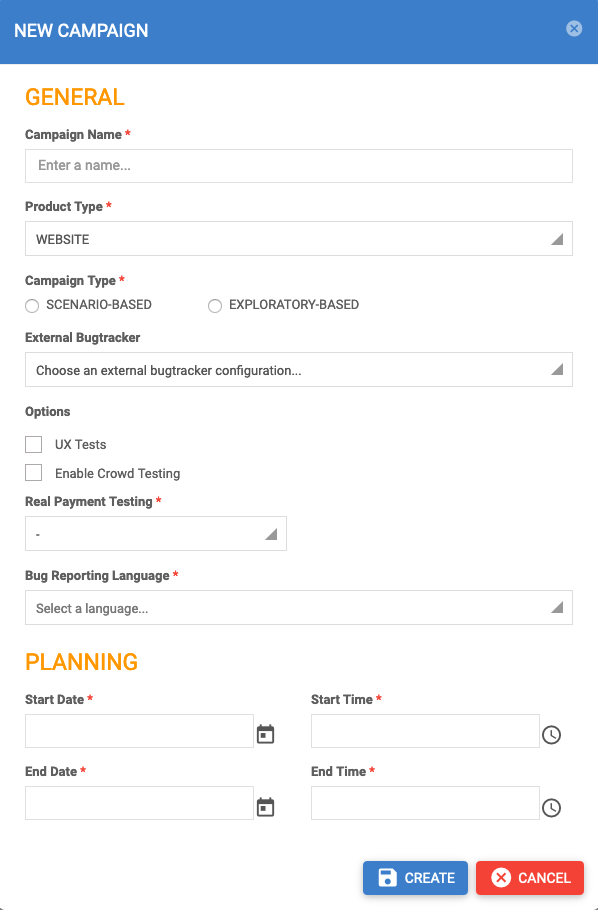
Fill in the following mandatory fields:
- Campaign Name: Enter the name of the campaign to create
- Product Type: Select from the drop-down list the type of product to test (WEBSITE, APP, IOT)
- Campaign Type: Select whether the campaign is exploratory or scripted
- Real Payment Testing: Indicate whether or not the campaign will require payments in production
- Bug Reporting Language: Select from the drop-down list the language in which the bugs should be written (English, French, German, Spanish)
- PLANNING (Start Date, Start time, End Date, End Time): Select in the Datepicker the start and end dates and times of the campaign
- Also indicate the optional options:
- External Bugtracker: Select in the drop-down list the export configuration to a client bugtracker desired (this configuration must be done before the creation of the campaign)
- Options: Check the UX Tests and/or Enable Crowd Testing boxes if the campaign must contain these options.
The Delete button (trash can icon) in the Commands column allows you to delete the corresponding campaign. A confirmation Pop-In window appears before the campaign is actually deleted.
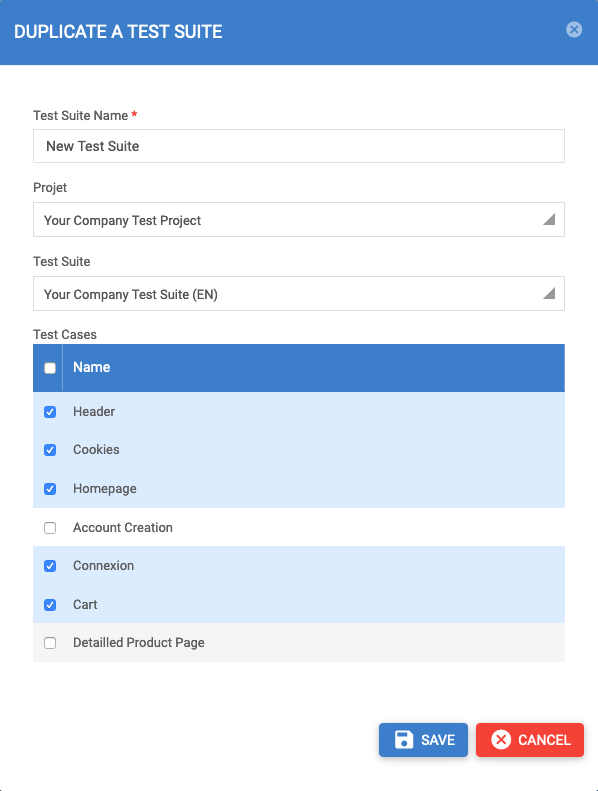
Under Test Suites, the IMPORT FROM ANOTHER PROJECT button allows you to create a new Test Suite based on an existing Test Suite from another project. Click on this button to bring up a selection pop-up window. Give your new Test Suite a name, choose the project and then the Test Suite to copy. You can also select only certain Test Cases from the original Test Suite before importing. Finally, click the SAVE button to create the new Test Suite, or CANCEL to cancel the action.
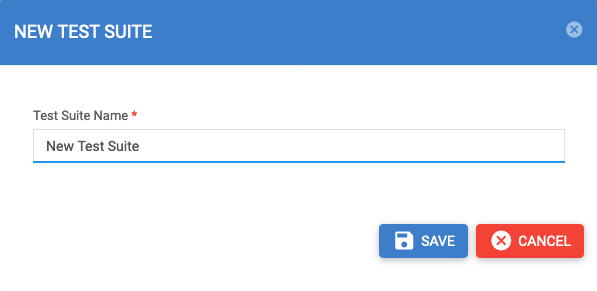
The NEW TEST SUITE button allows you to create a new blank Test Suite. Enter its name and click on the SAVE button to create the new Test Suite, or CANCEL to cancel the action.
The buttons in the Commands column allow you to act on the Test Suites already created:
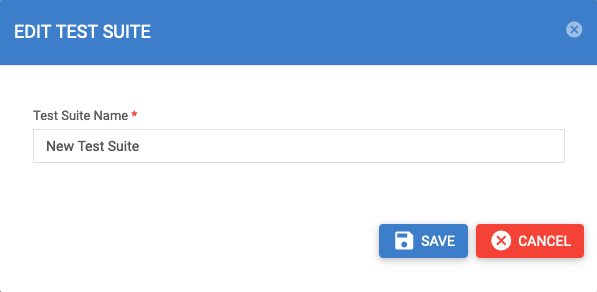
- Rename Test Suite: When clicked, a Pop-In window appears. Change the name of the Test Suite in the field and click SAVE to rename the Test Suite, or CANCEL to cancel the action.
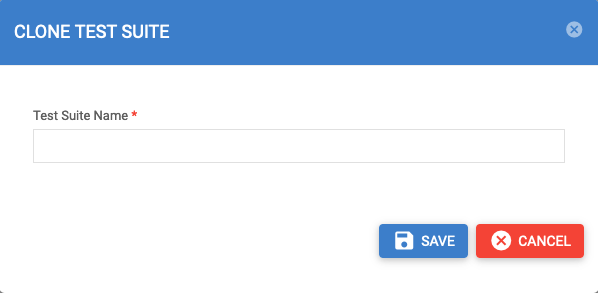
- Clone Test Suite: When clicked, a Pop-In window appears. Enter the name of the new Test Suite, which will be a duplicate of the source Test Suite and click SAVE to rename the Test Suite, or CANCEL to cancel the action.
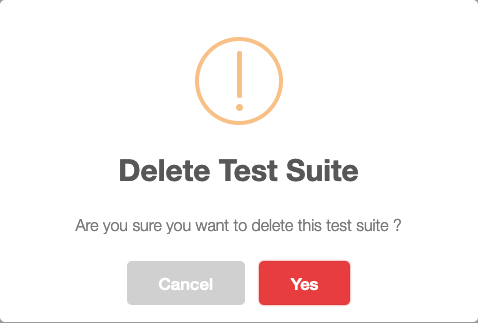
- Delete Test Suite: When clicked, a confirmation pop-up window appears before the Test Suite is actually deleted. Click YES to delete the Test Suite, or CANCEL to cancel the action.
¶ Campaign Details
¶ As a Client
¶ Guided Campaign
_new.png)
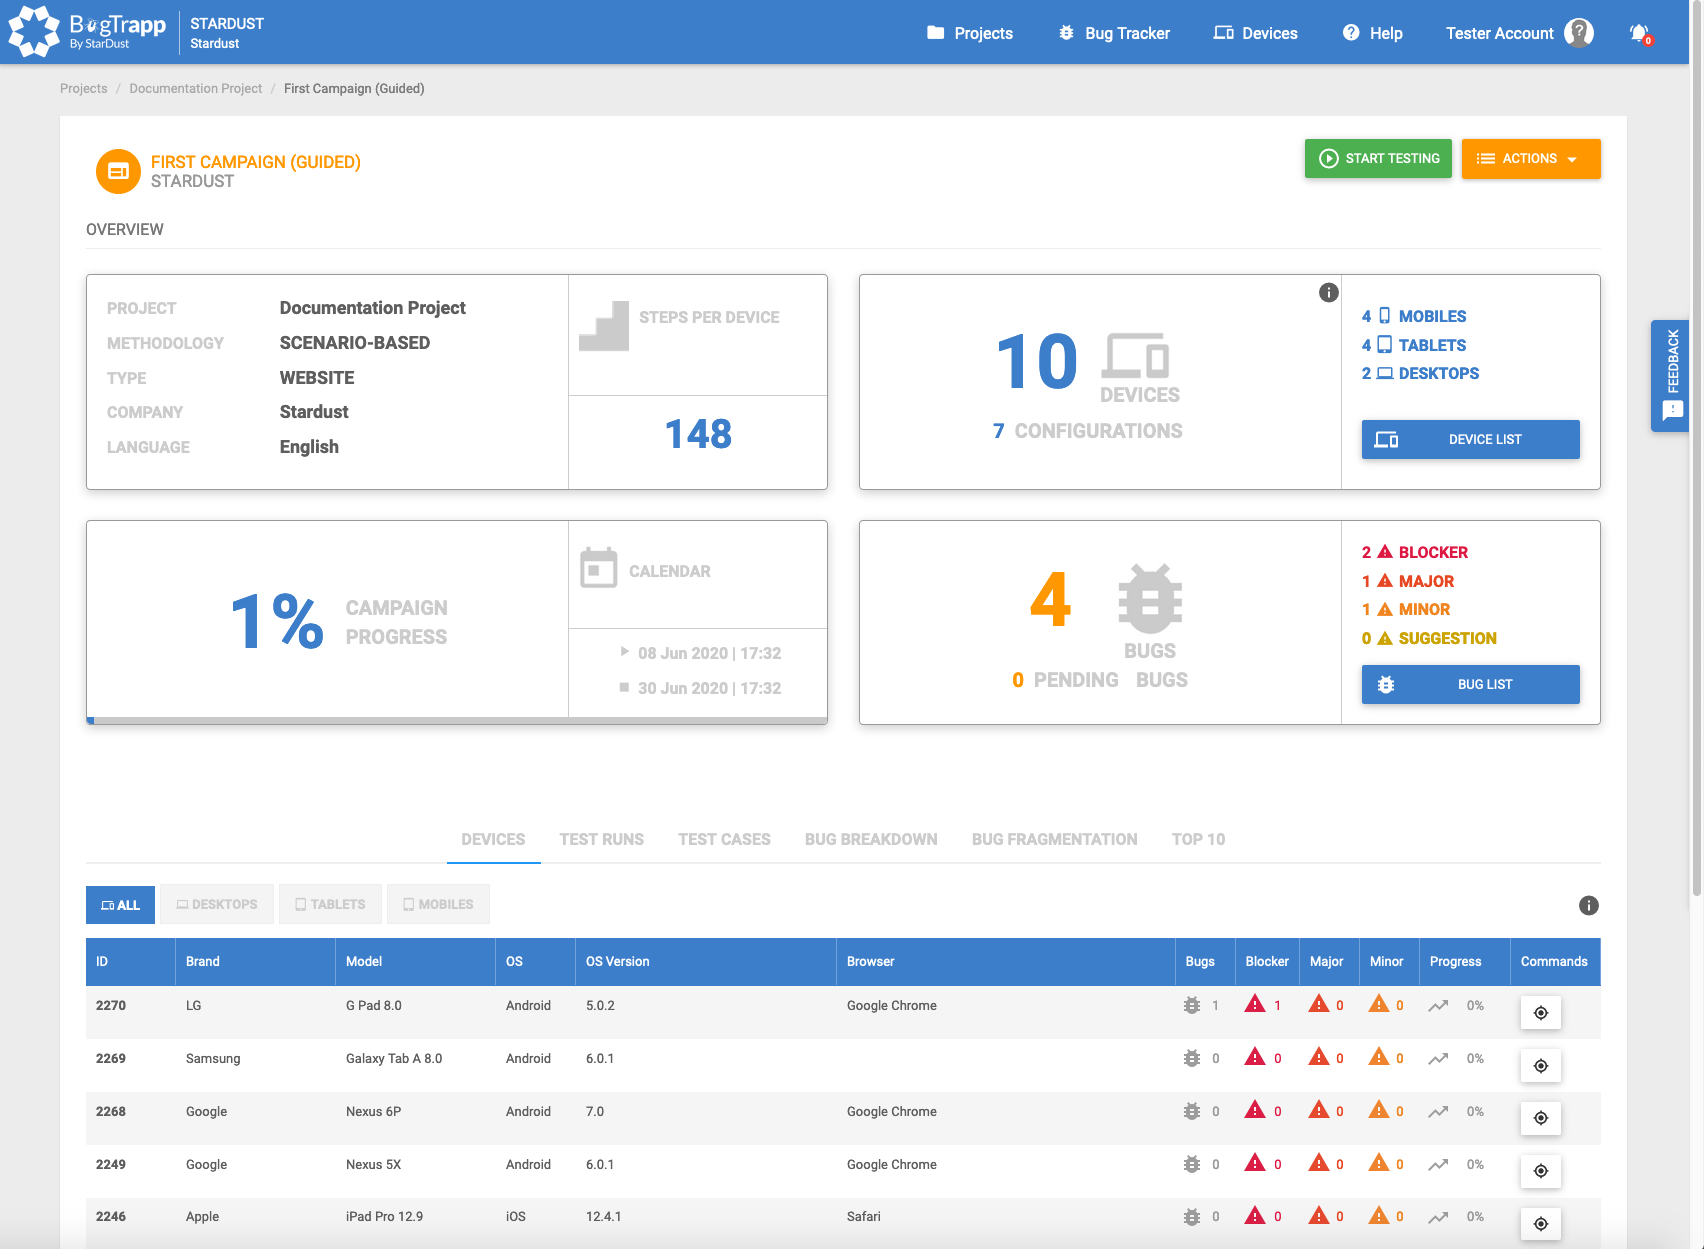
On the Campaign Details page, you can see the project information arranged in several blocks.
A GET DETAILED REPORT button will be displayed in case the StarDust PM has attached a report file to the campaign.

A GET EXCEL TEST SUITE button will be displayed in case the StarDust PM has attached a Test Suite Excel file to the campaign.

Under Overview there are 4 blocks. The first one indicates information such as the name of the project or the testing methodology used. For a guided campaign, you will also see the number of steps per configuration in the Test Suite used (clicking on this number will take you to the Test Suite (→ Test Suite Details)).
The second block concerns configurations and indicates the number of each type of device. Click on the CONFIGURATION LIST button to access the Configuration List for this campaign (→ CONFIGURATION LIST).
The third block shows the progress of the campaign. Finally, the fourth block concerns the bugs and indicates the number of each type. Furthermore, in this block, a ISSUE LIST button allows you to directly access the bugtracker and display the list of bug tickets for this campaign (→ Issue List - All bugs).
The second part of this page displays different tables and other KPIs according to the selected tabs.
Under the CONFIGURATIONS tab there are 4 sub-tabs corresponding to the device types (ALL, DESKTOPS, TABLETS, MOBILES). The table displays for each device the number of bugs detected on it and its progress in the Test Suite. You can click on the header of a column to sort its contents in ascending/alphabetical order.
Under the TEST RUNS tab are the same 4 previous sub-tabs. The table shows the list of Test Runs that have started. For each one, the number of bugs detected, its progression, the percentage of success (OK steps) and the name of the tester who performed the last action is displayed. You can click on the header of a column to sort its contents in ascending/alphabetical order.
By clicking on the line of a Test Run, you can access its details (→ Test Run).
Under the TEST CASES tab there is a filter for each device started. The table shows the list of Test Cases in the Test Suite. For each of them is displayed details such as % of coverage, progress and success, number of OK, KO, N/A etc... You can click on the header of a column to sort its contents in ascending/alphabetical order.
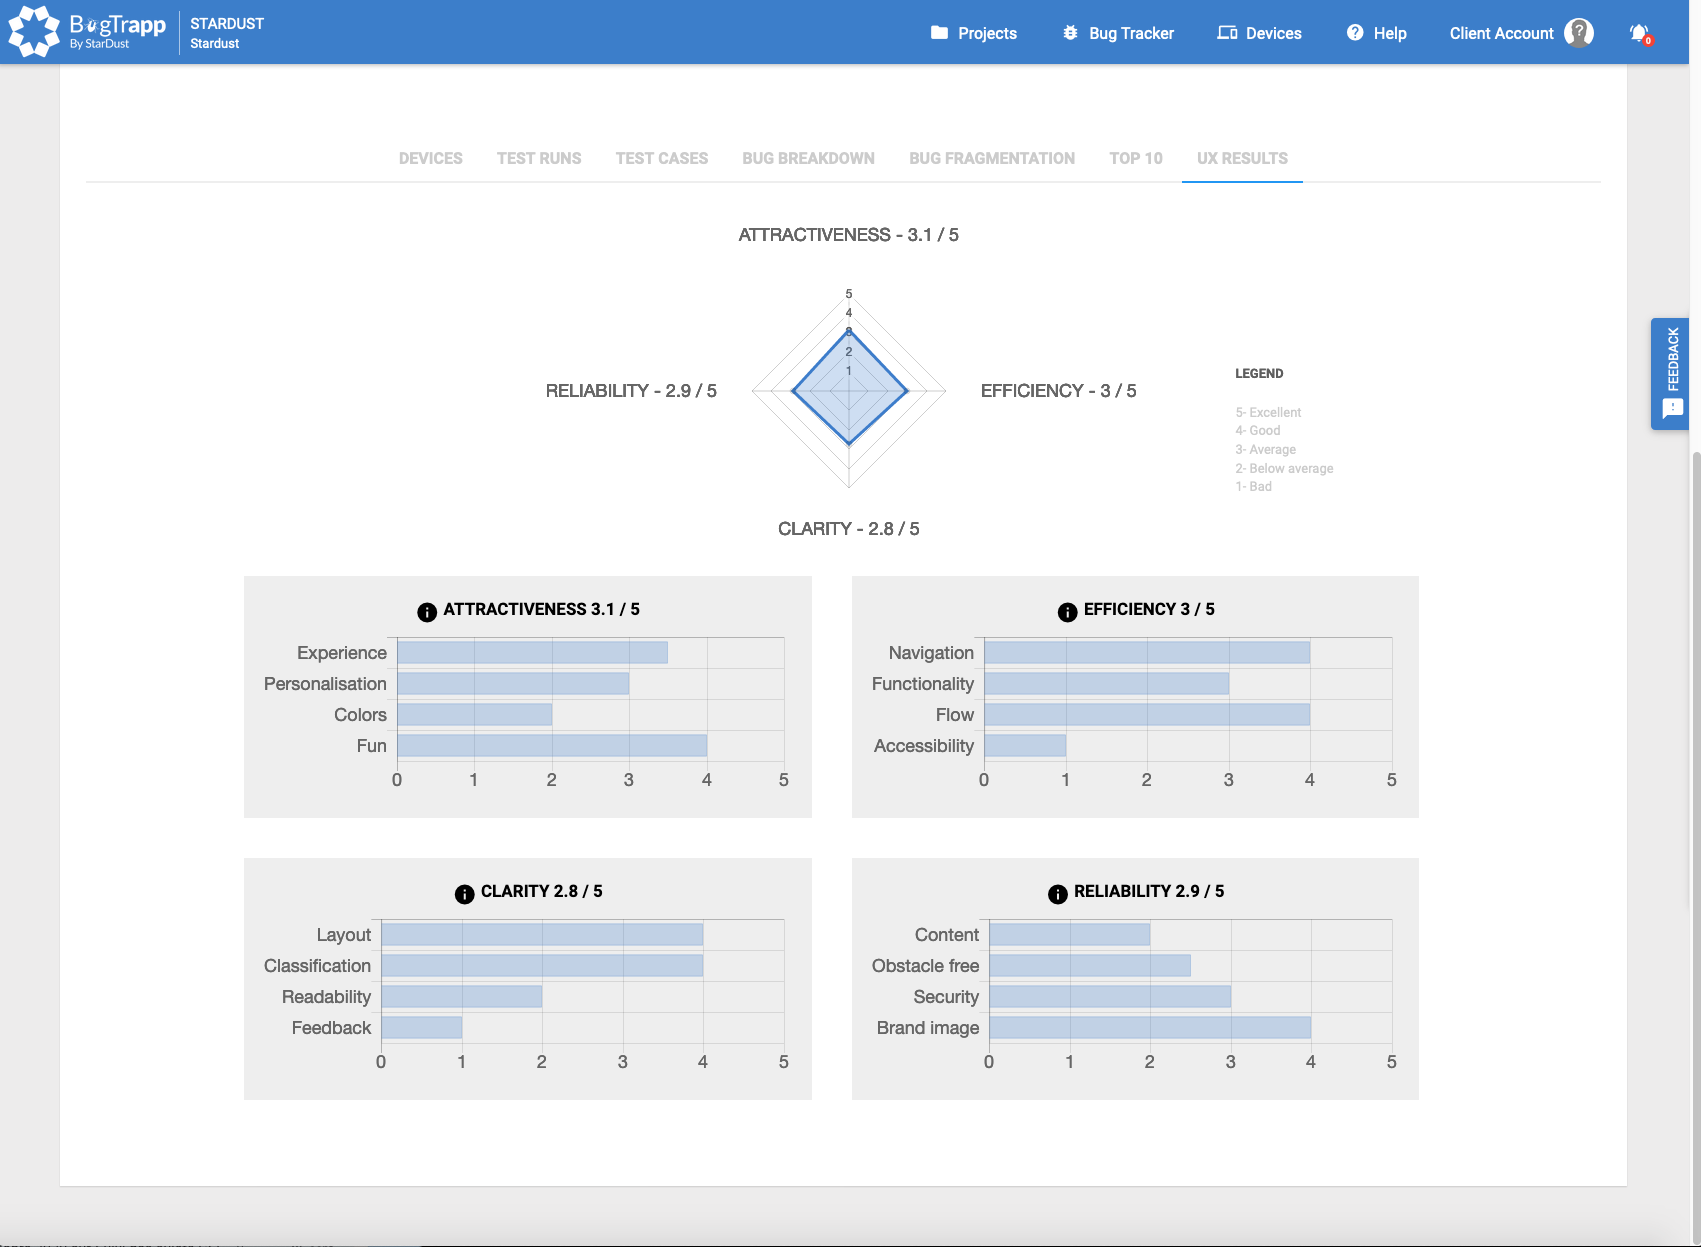
Under the ISSUE BREAKDOWN tab you will find different pie charts concerning bugs (Type, Criticality, Status etc...).
Under the ISSUE FRAGMENTATION tab is a graph showing the fragmentation of the bugs on the campaign as well as its score (percentage of fragmentation).
Under the TOP 10 tab there are two graphs showing the browser and OS versions with the most bugs on the campaign.
Under the UX RESULTS tab you will find UX results (if this option has been requested in the test service) are available as graphs for UX tests with simple answers (graded from 1 to 5) or as Google Form results for UX tests with complex answers (open-ended questions, etc...).
¶ Exploratory campaign
_new.png)
For an exploratory campaign, the only element that differs is the first block under Overview, which does not mention the number of steps in the test suite because it does not exist for this test methodology.
In addition, the TEST RUNS, TEST CASES and ISSUE FRAGMENTATION tabs are absent for the same reason.
¶ As a Tester
¶ Guided Campaign
The Test role gives you access to the following additional actions and informations:
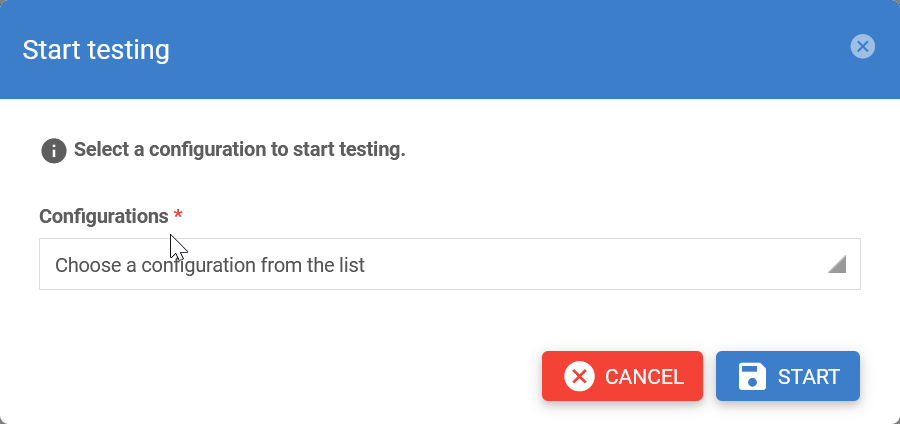
Two buttons appear in the upper right corner of the page: START TESTING and ACTIONS.
Clicking on START TESTING will bring up a pop-in window with the required settings before starting the test. Here you choose the configuration on which to run your test. Once selected, click the START button on the Pop-in to go to the Test Run that corresponds to these selections. (→ Test Run).
Click on the ACTIONS button to choose one of the possible actions: "View Instructions" and "Get Excel Report (Beta)".
By choosing "View Instructions", you will be able to see the instructions (left by your PM to help you run your tests on this campaign) in a new Pop-in. Once you have read them, click on the cross to close this pop-in window and return to the Campaign Details page.
By choosing "Get Excel Report (Beta)" you will download an excel file containing all bugs already reported on BugTrapp.
Finally, in the fourth block, additional information is provided regarding the number of Pending issues.
¶ Exploratory Campaign:
The Test role gives you access to the following additional action:
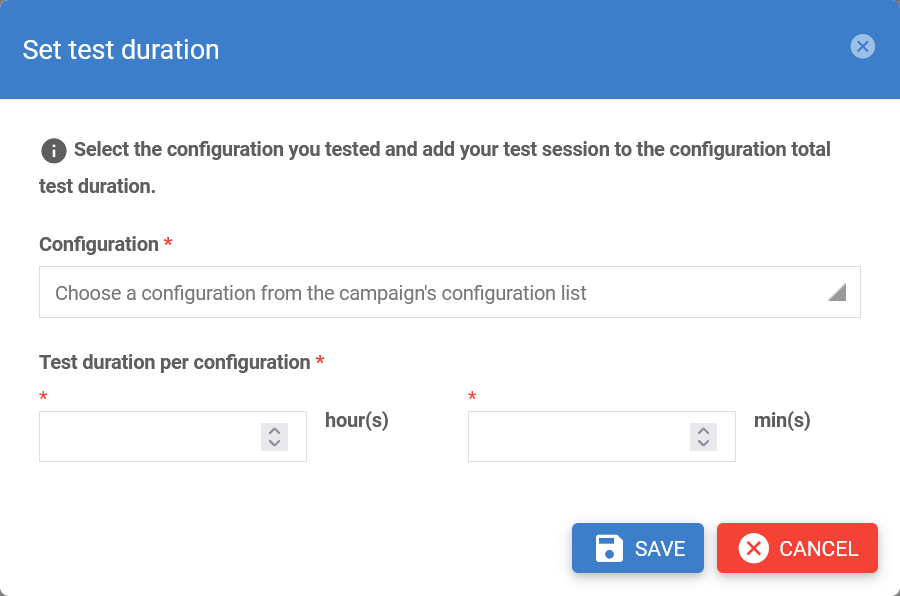
Set Device Test Duration: opens a Pop-In window allowing you to declare the time spent on the tested configuration. Select your configuration, fill in the hour(s) and min(s) fields and click SAVE to save, or CANCEL to cancel the action.
¶ As an Analyst, PM
¶ Guided campaign
The Analyst and PM roles gives you access to the following additional actions and information:
In the Actions submenu you can click on the following choices:
-
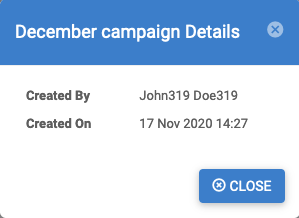
View details: opens a Pop-In window giving detailed information about the campaign (Campaign name, creator name, creation date)
-
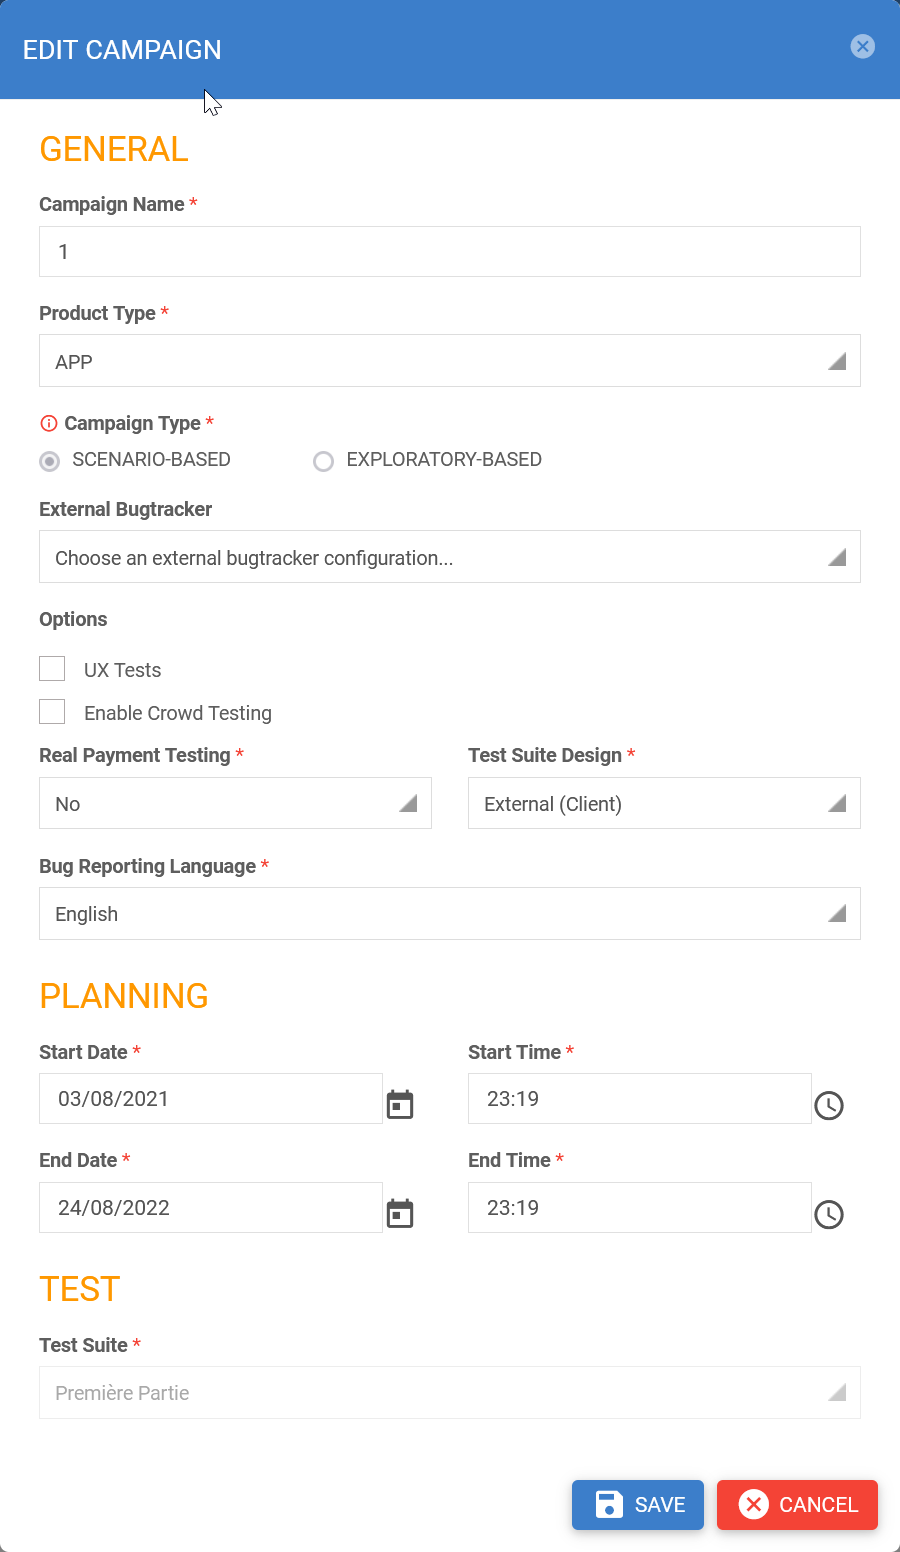
Edit Campaign: opens a Pop-In window to edit the campaign data :
Campaign Name, Product Type(WEBSITE, APP, IOT), Campaign Type(Scenario-Based, Exploratory-Based), External Bugtracker, Options(UX Tests, Enable Crowd Testing), Real Payment Testing(Yes, No), Test Suite Design (Internal, External), Bug Reporting Language(English, French, German, Spanish), PLANNING (Start Date, Start time, End Date, End Time), Test Suite.
-
Edit Instructions: opens a Pop-In window allowing you to edit the instructions to be given to the testers for the proper conduct of the test campaign. Enter these instructions in the text field (integrating a WISIWIG text editor) then click on YES to save these Instructions, or CANCEL to cancel the action.

-
Get Excel Report : (same as the tester role)
-
Get Word Report: opens a pop-up window allowing you to choose the language of the Word report generated by BugTrapp. Click on EN or FR to download the report in Word format and in the chosen language. This campaign delivery report is intended for the PMs before being sent to the client.
-
Attach Report: Opens a system window to browse your computer for the final Word report to send to the client. Once done, the client (and all other roles) will see a download button on the Campaign Details page to retrieve this file. When opening the Actions menu again, the Attach Report line is renamed Remove Report so that you can remove an attached report if needed (only one report maximum per campaign).
-
Attach Excel Test Suite: Opens a system window to browse your computer for the Test Suite in Excel format to send to the client. Once done, the client (and all other roles) will see a download button on the Campaign Details page to retrieve this file. By opening the Actions menu again, the Attach Excel Test Suite line is renamed Remove Excel Test Suite so that you can remove an attached Test Suite if needed (only one report maximum per campaign).
-
Start Testing: The START TESTING button is displayed in the Actions submenu instead of being highlighted next to the Actions button as for the Test role. The click action is identical.
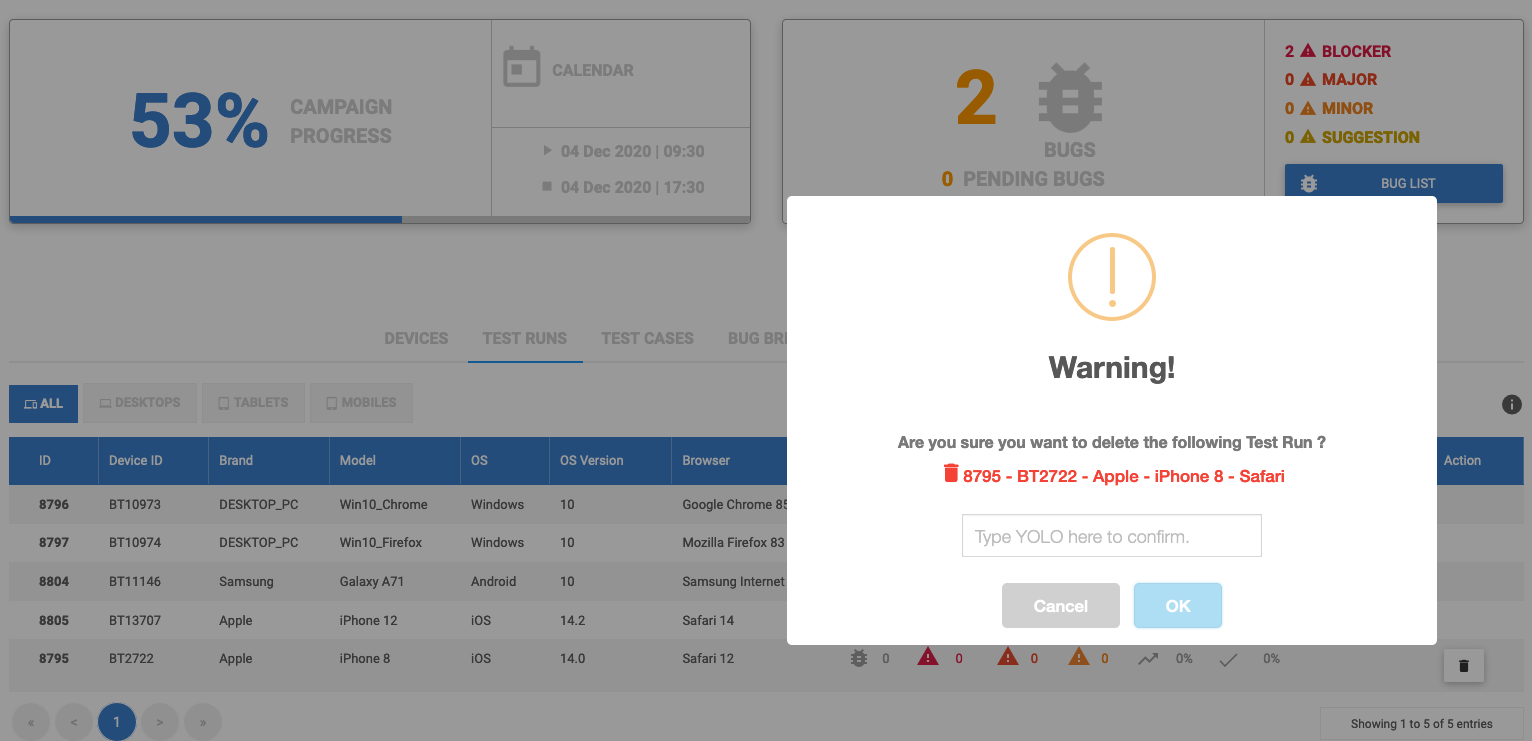
In the second part of the page, under the TEST RUNS tab, the Action column displays a Delete Test Run button that allows you to delete a Test Run that has not been started. When clicked, a confirmation pop-up window opens. Type YOLO in the field as shown and click the OK button to delete the Test Run, or Cancel to cancel the action.
¶ Exploratory Campaign
For an exploratory campaign as Analyst, the Attach Excel Test Suite and Get Excel Test Suite actions are not available for this test methodology because there is no Test Suite.
¶ As a PM
¶ Creating a Crowd Mission
To create a Crowd mission linked to the campaign, click on the NEW MISSION button to display the mission type selection popup. Choose the type of mission you want to create: NEW MISSION for a "classic" test mission.
You also have the option to make the mission private. By activating this option, the created mission will not be visible on the Dashboard or in the missions list, and will therefore only be accessible by invitation. Once you have made your choice, click on the CREATE MISSION button.
¶ NEW MISSION
You can see on this "CREATE A MISSION" page the elements (mandatory and non-mandatory) to fill in to create a mission. These elements are grouped by theme in four tabs: GENERAL, REMUNERATION, RESTRICTIONS and WORKSPACE. Under the section containing these 4 tabs, you can click on SAVE AS DRAFT to save some of the fields already filled in, or on SAVE AND PUBLISH if you have filled in all the fields of the 4 tabs in order to launch the mission.
¶ GENERAL
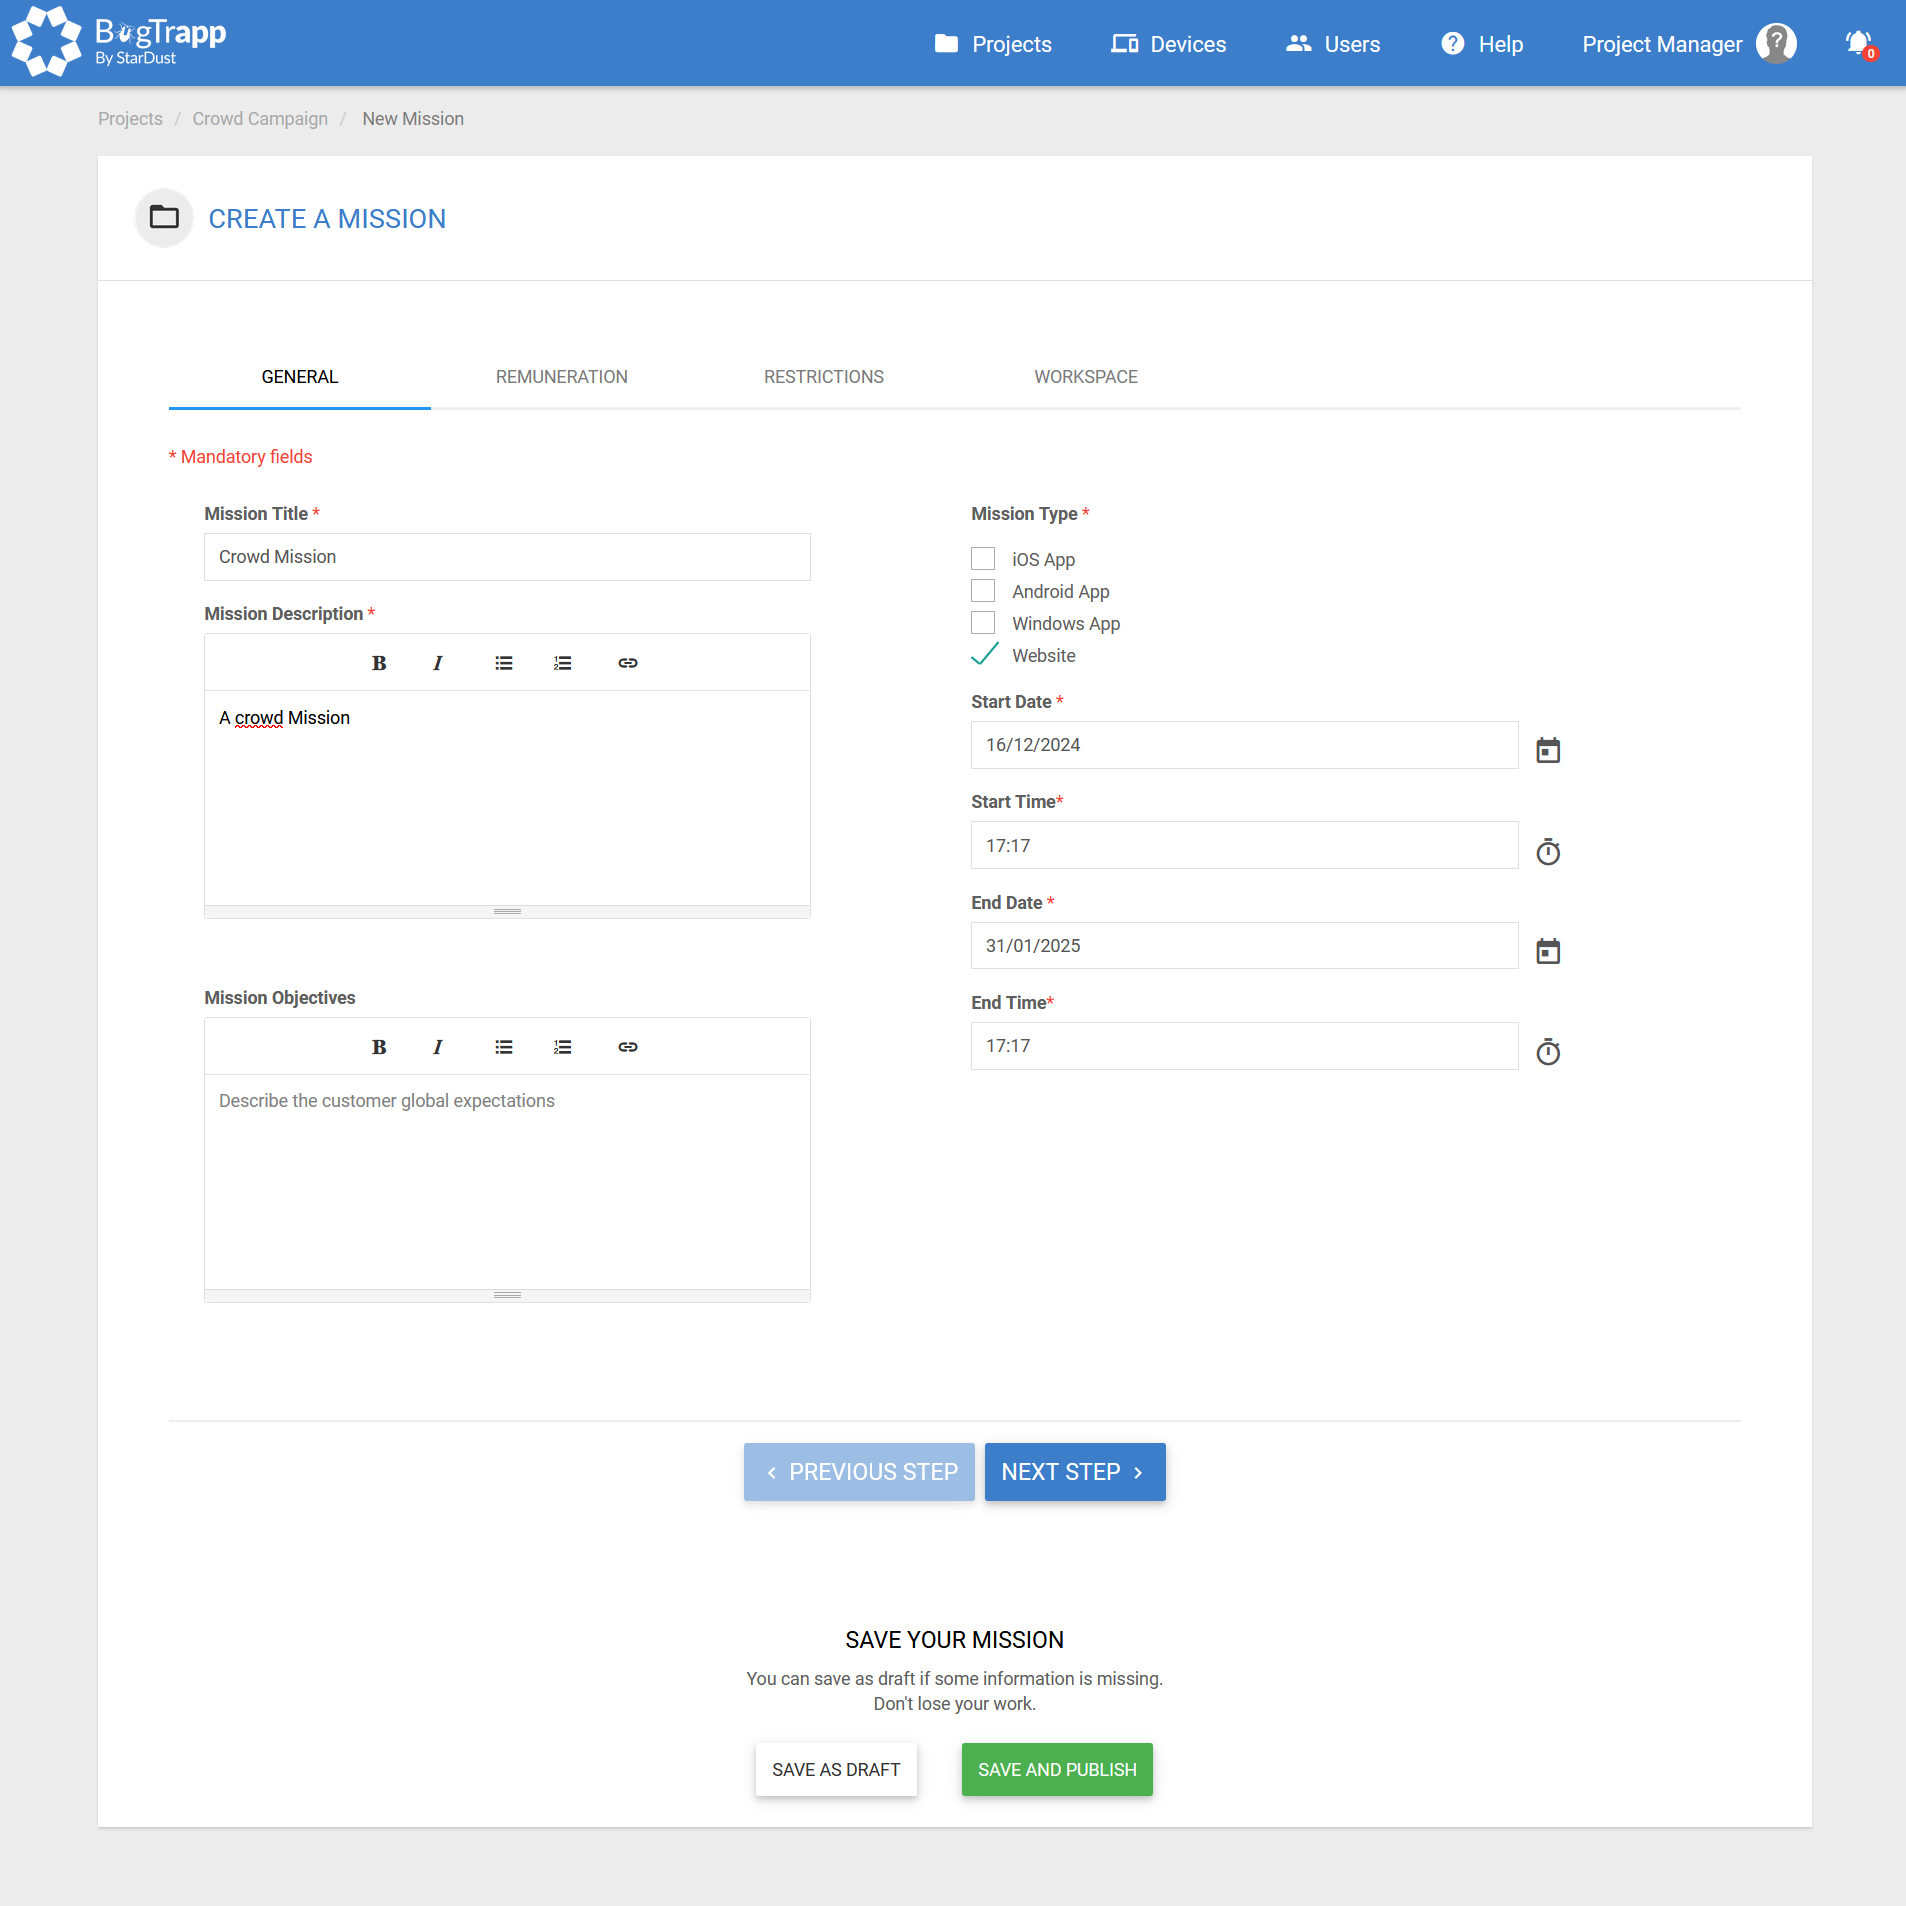
Fill in the following mandatory fields in this tab:
- Mission Title
- Mission Description
- Mission Type
- Start Date (Pre-filled with campaign data)
- Start Time (Pre-filled with campaign data)
- End Date (Pre-filled with campaign data)
- End Time (Pre-filled with campaign data)
You can also fill in the Mission Objectives field
¶ REMUNERATION
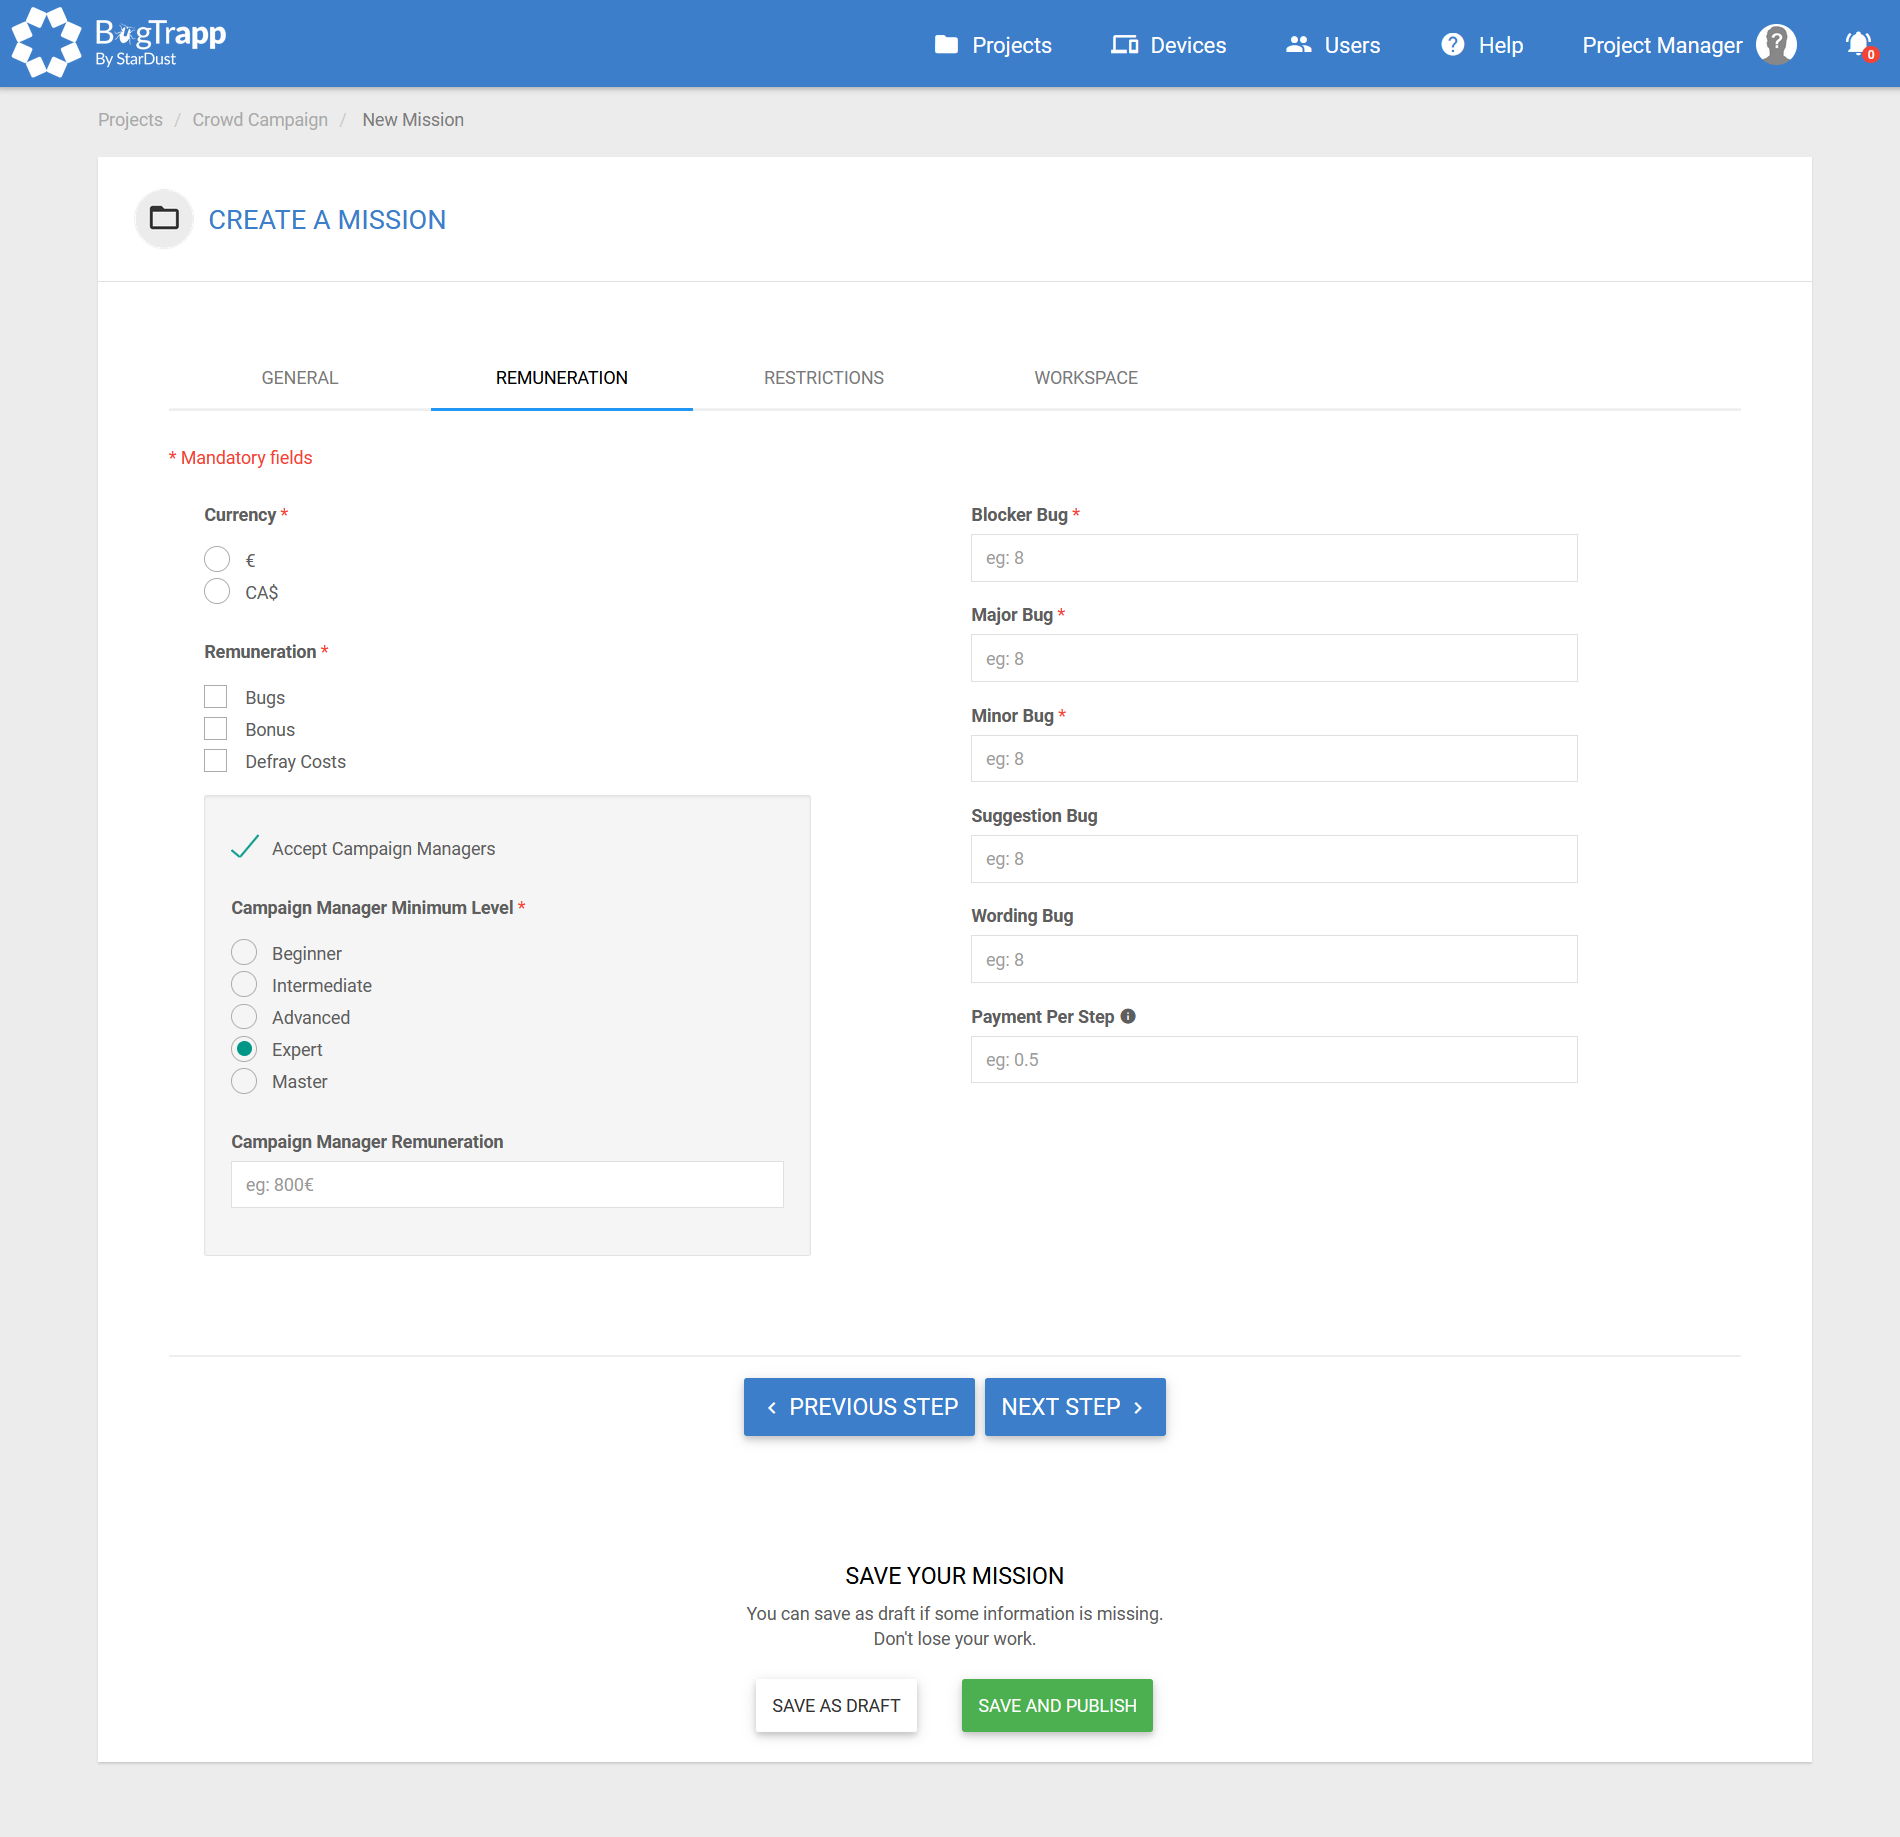
Fill in the following mandatory fields in this tab:
- Currency
- Remuneration
- Blocker Bug
- Major Bug
- Minor Bug
You can also choose to accept a suggestion and formulate bugs by filling in the associated compensation.
You can grant compensation for the number of steps completed for a guided mission.
You can accept FP testers by entering an overall bonus compensation in the "Reviewer Bonus" field.
Finally, you can choose to accept CMs on this assignment. If you check this box, you will need to choose the minimum level of CM needed to manage this mission, as well as their overall compensation in the "Campaign Manager Remuneration" field ( invisible field if the CM box is unchecked).
¶ RESTRICTIONS
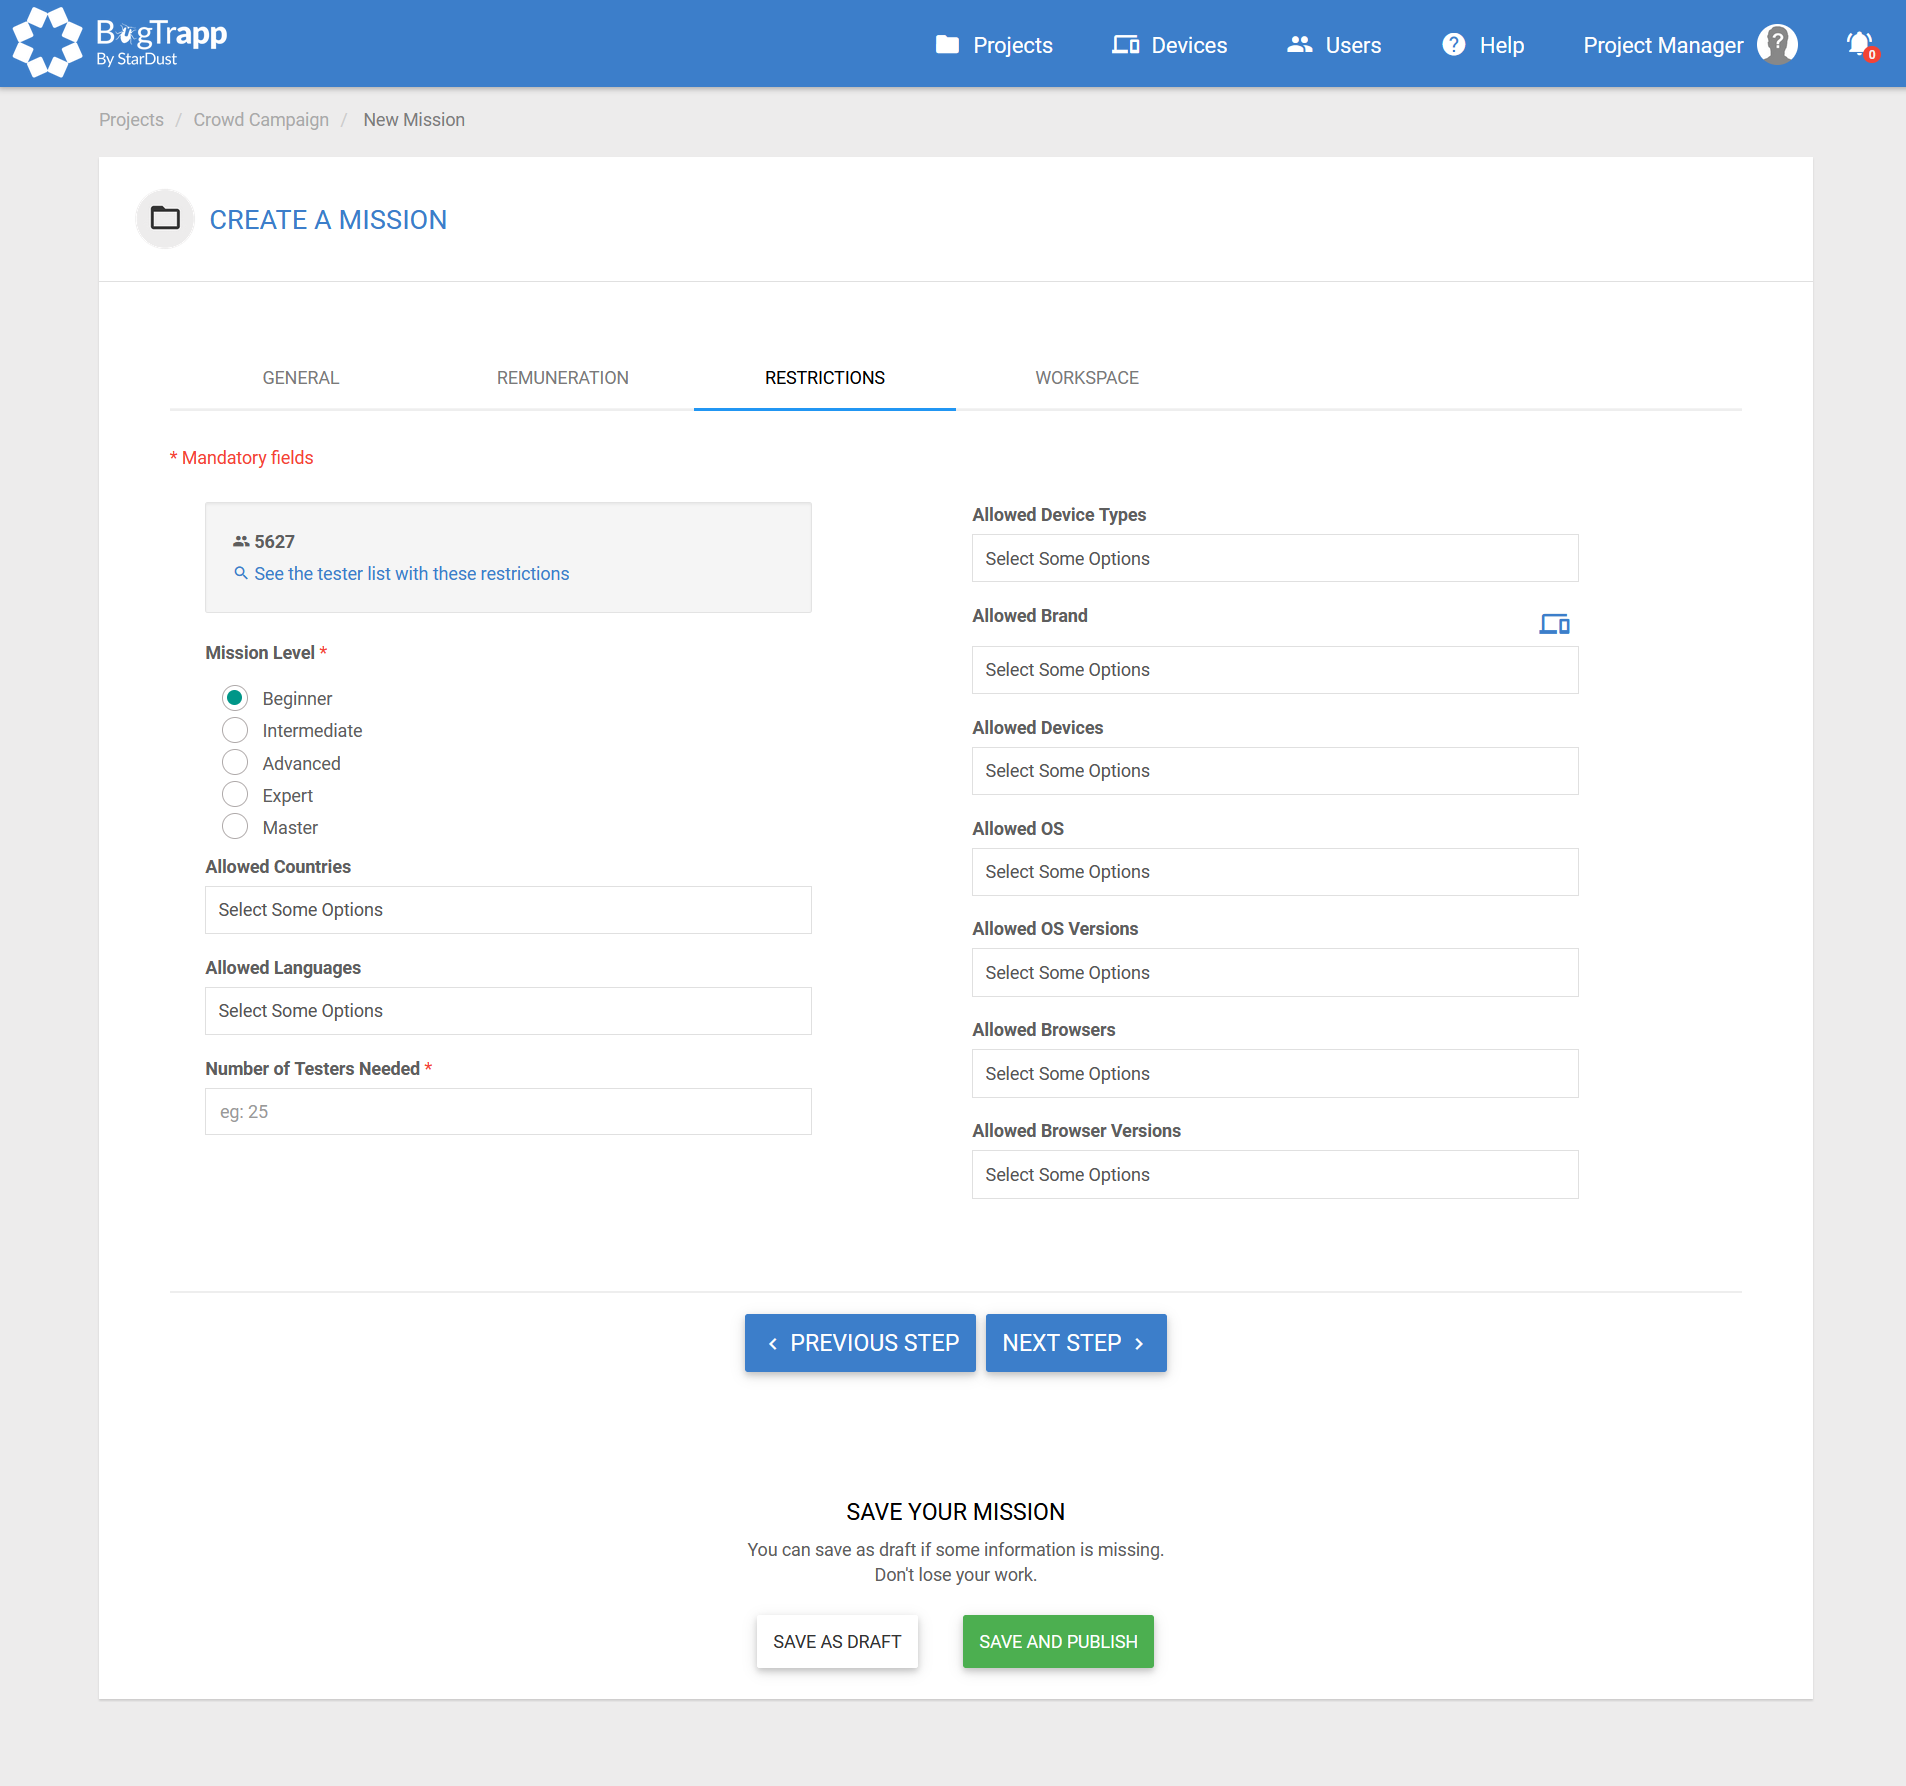
Fill in the following mandatory fields in this tab :
- Mission Level
- Number of Testers Needed
You can also fill in the information in the following fields :
- Allowed Countries
- Allowed Languages
- Allowed Device Types
- Allowed Brand
- Allowed Devices
- Allowed OS
- Allowed OS Versions
- Allowed Browsers
- Allowed Browsers Versions
Here you can see the number of testers matching the criteria entered in this tab, updated in real time. You can click on the link to see the list of these testers.
¶ WORKSPACE
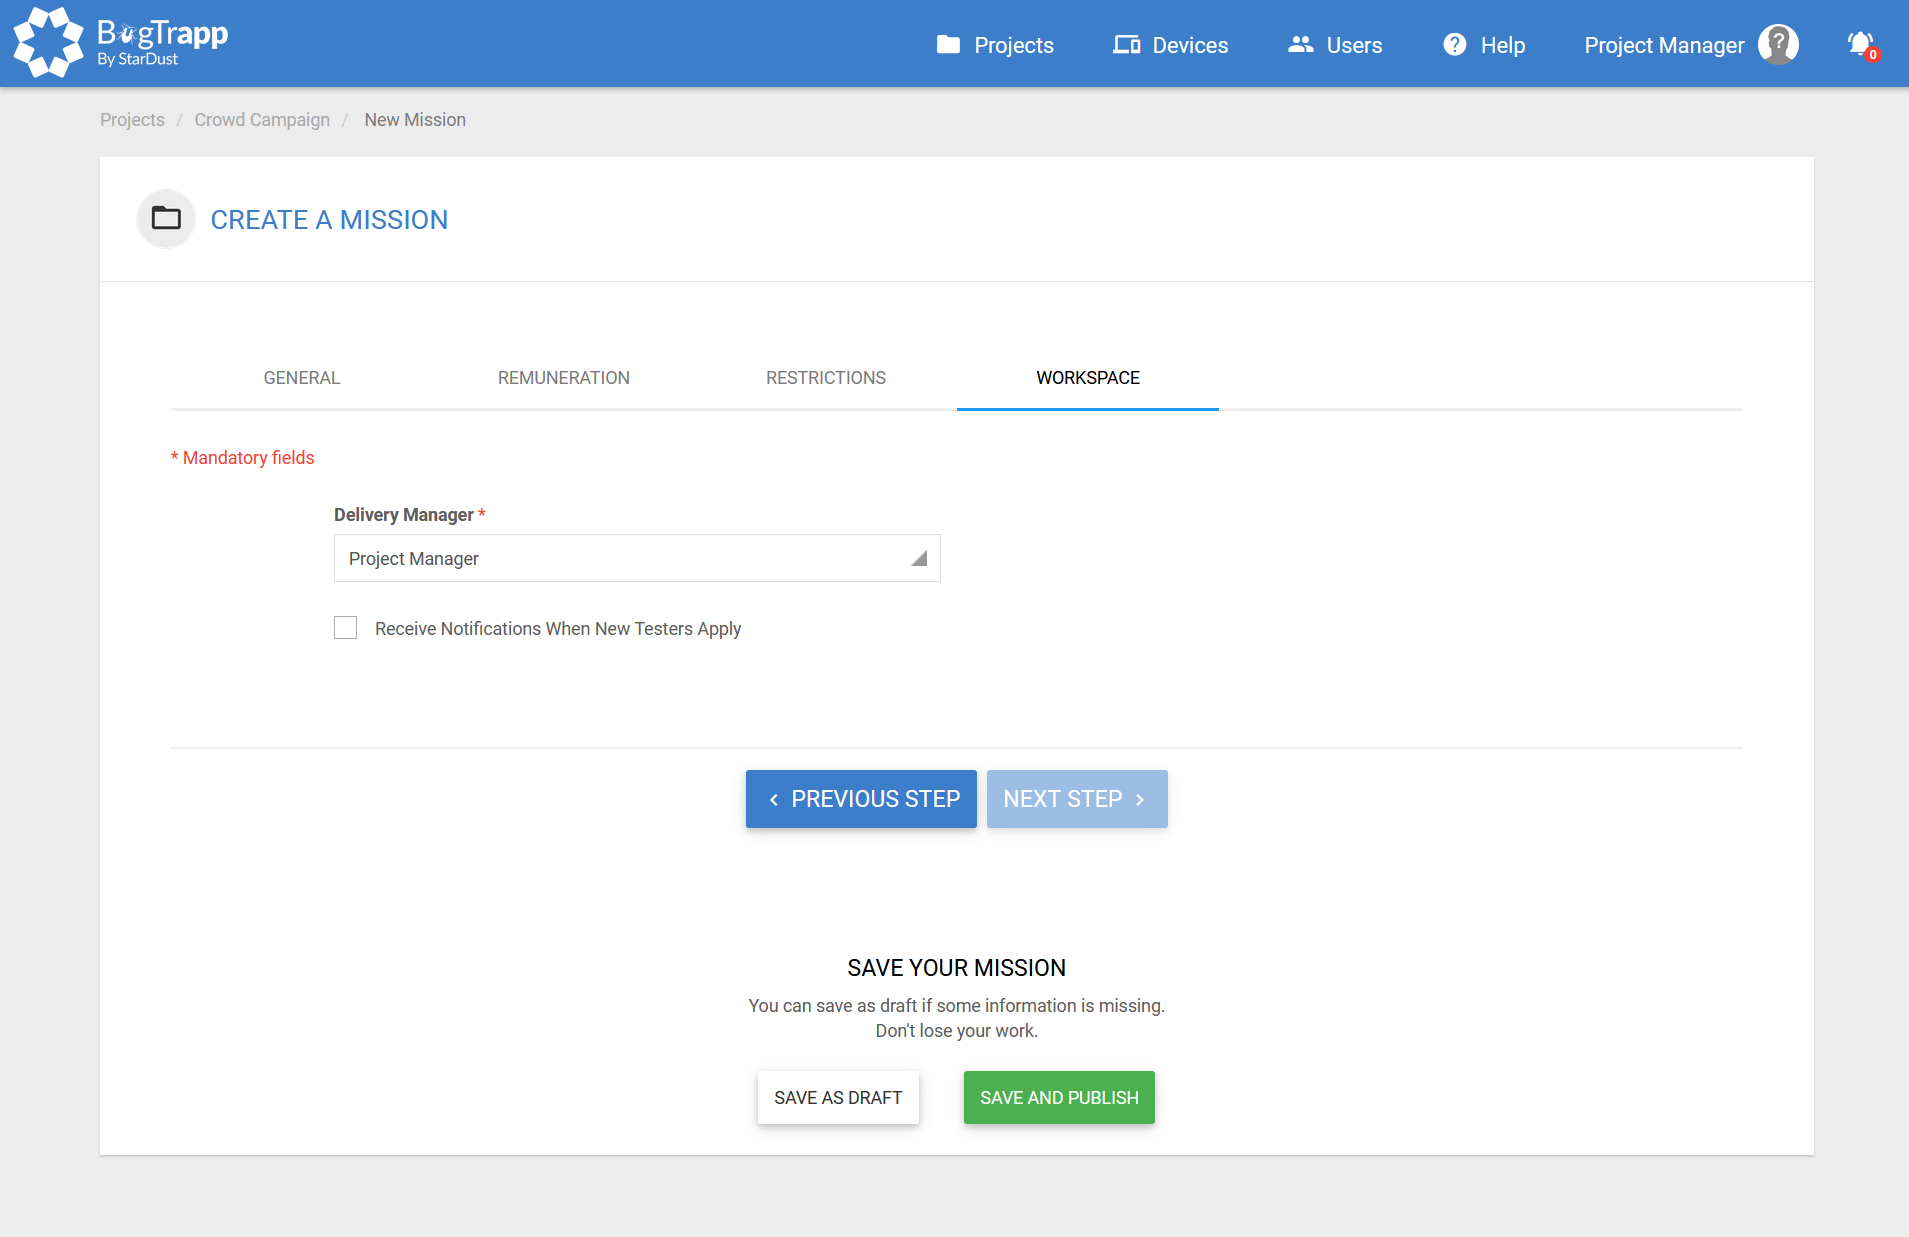
Fill in the following mandatory field in this tab :
- Delivery Manager
You can also receive notifications when new testers apply by checking the box.
¶ CONFIGURATION LIST
¶ As a Client
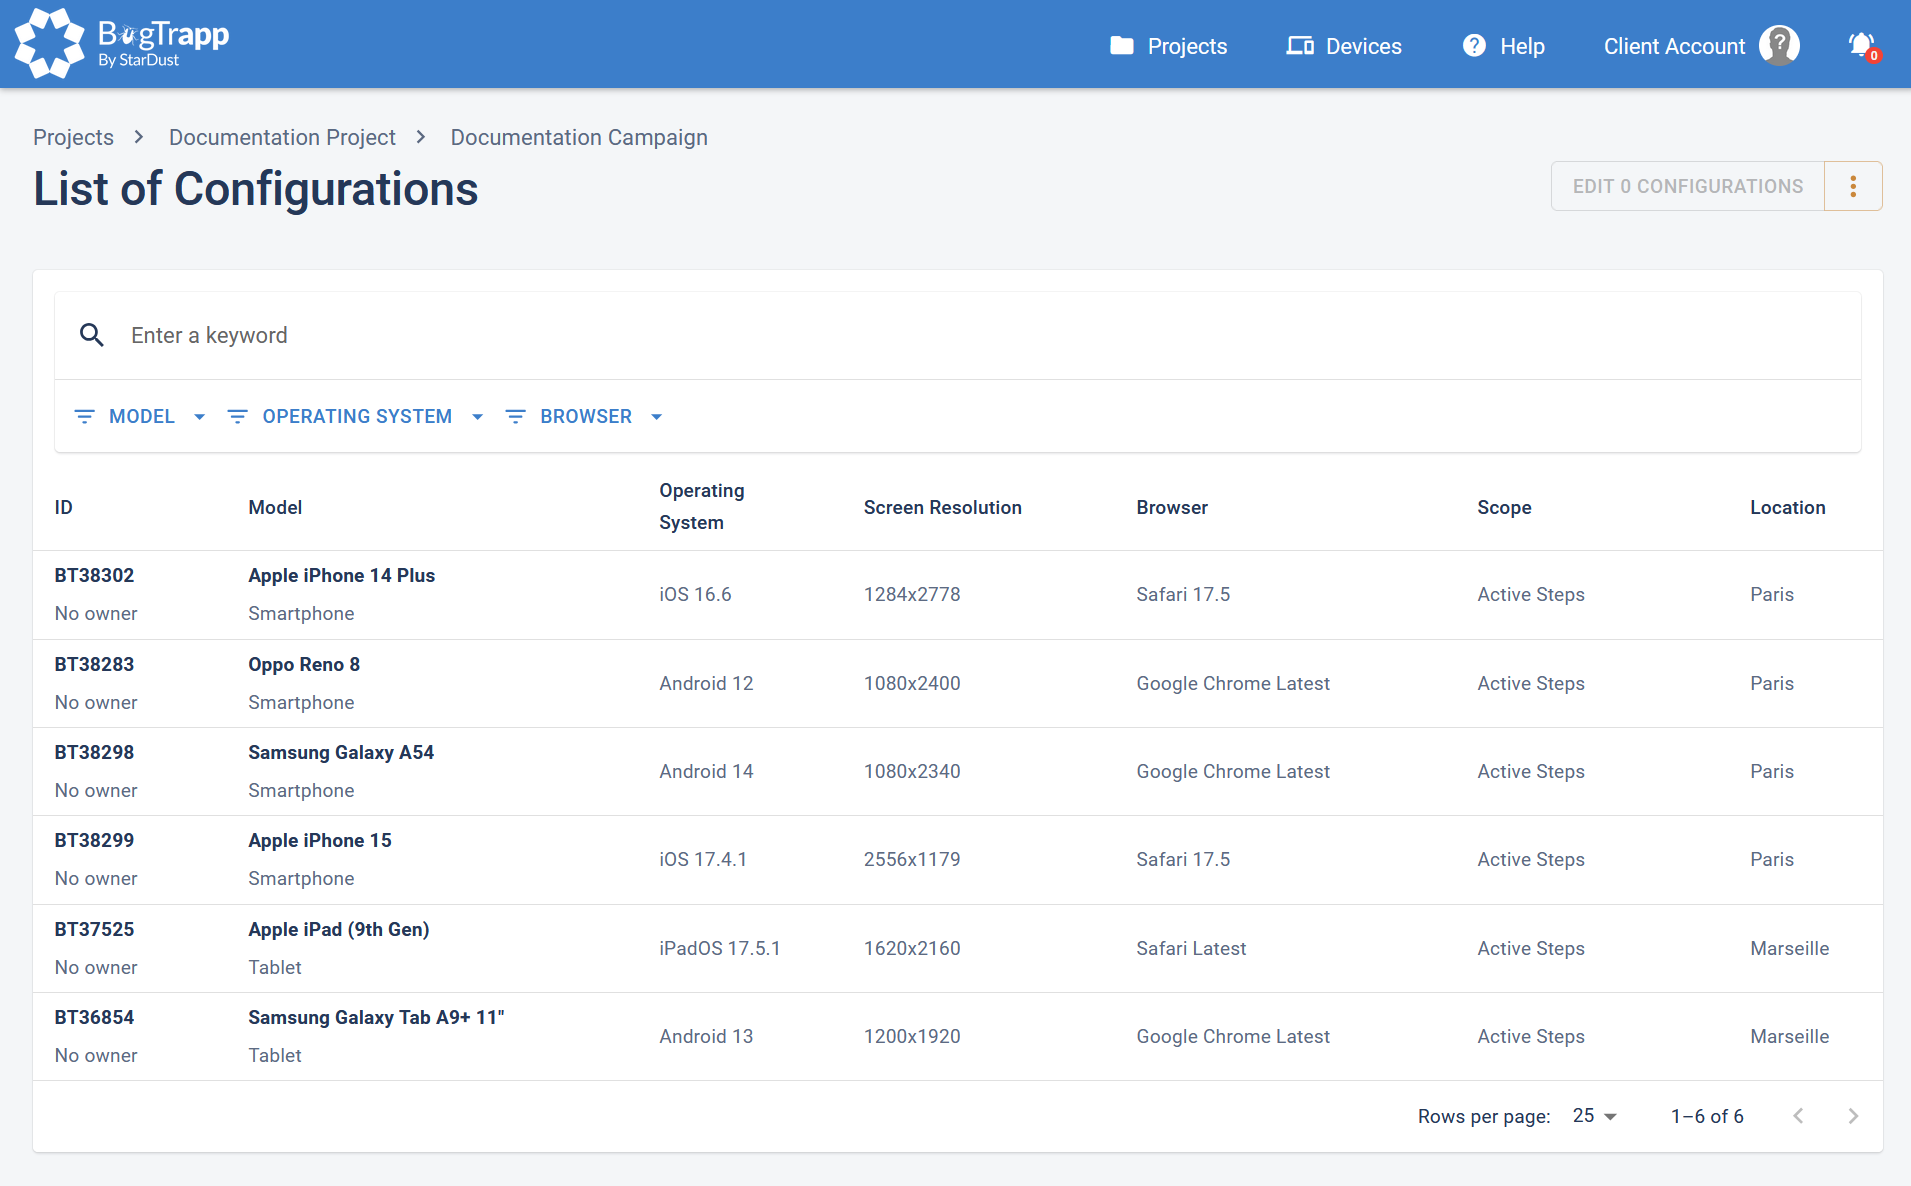
On this page you'll see a table listing all the configurations in the selected Configuration List. This table displays the ID, Model, OS, Resolution, Scope and Location columns.
A search field and filters (MODEL, OS, BROWSER) allow you to filter the display of this table.
At the bottom of the table is a selector for the number of elements per page and arrows for scrolling through the table pages.
¶ As a Tester, Analyst, PM
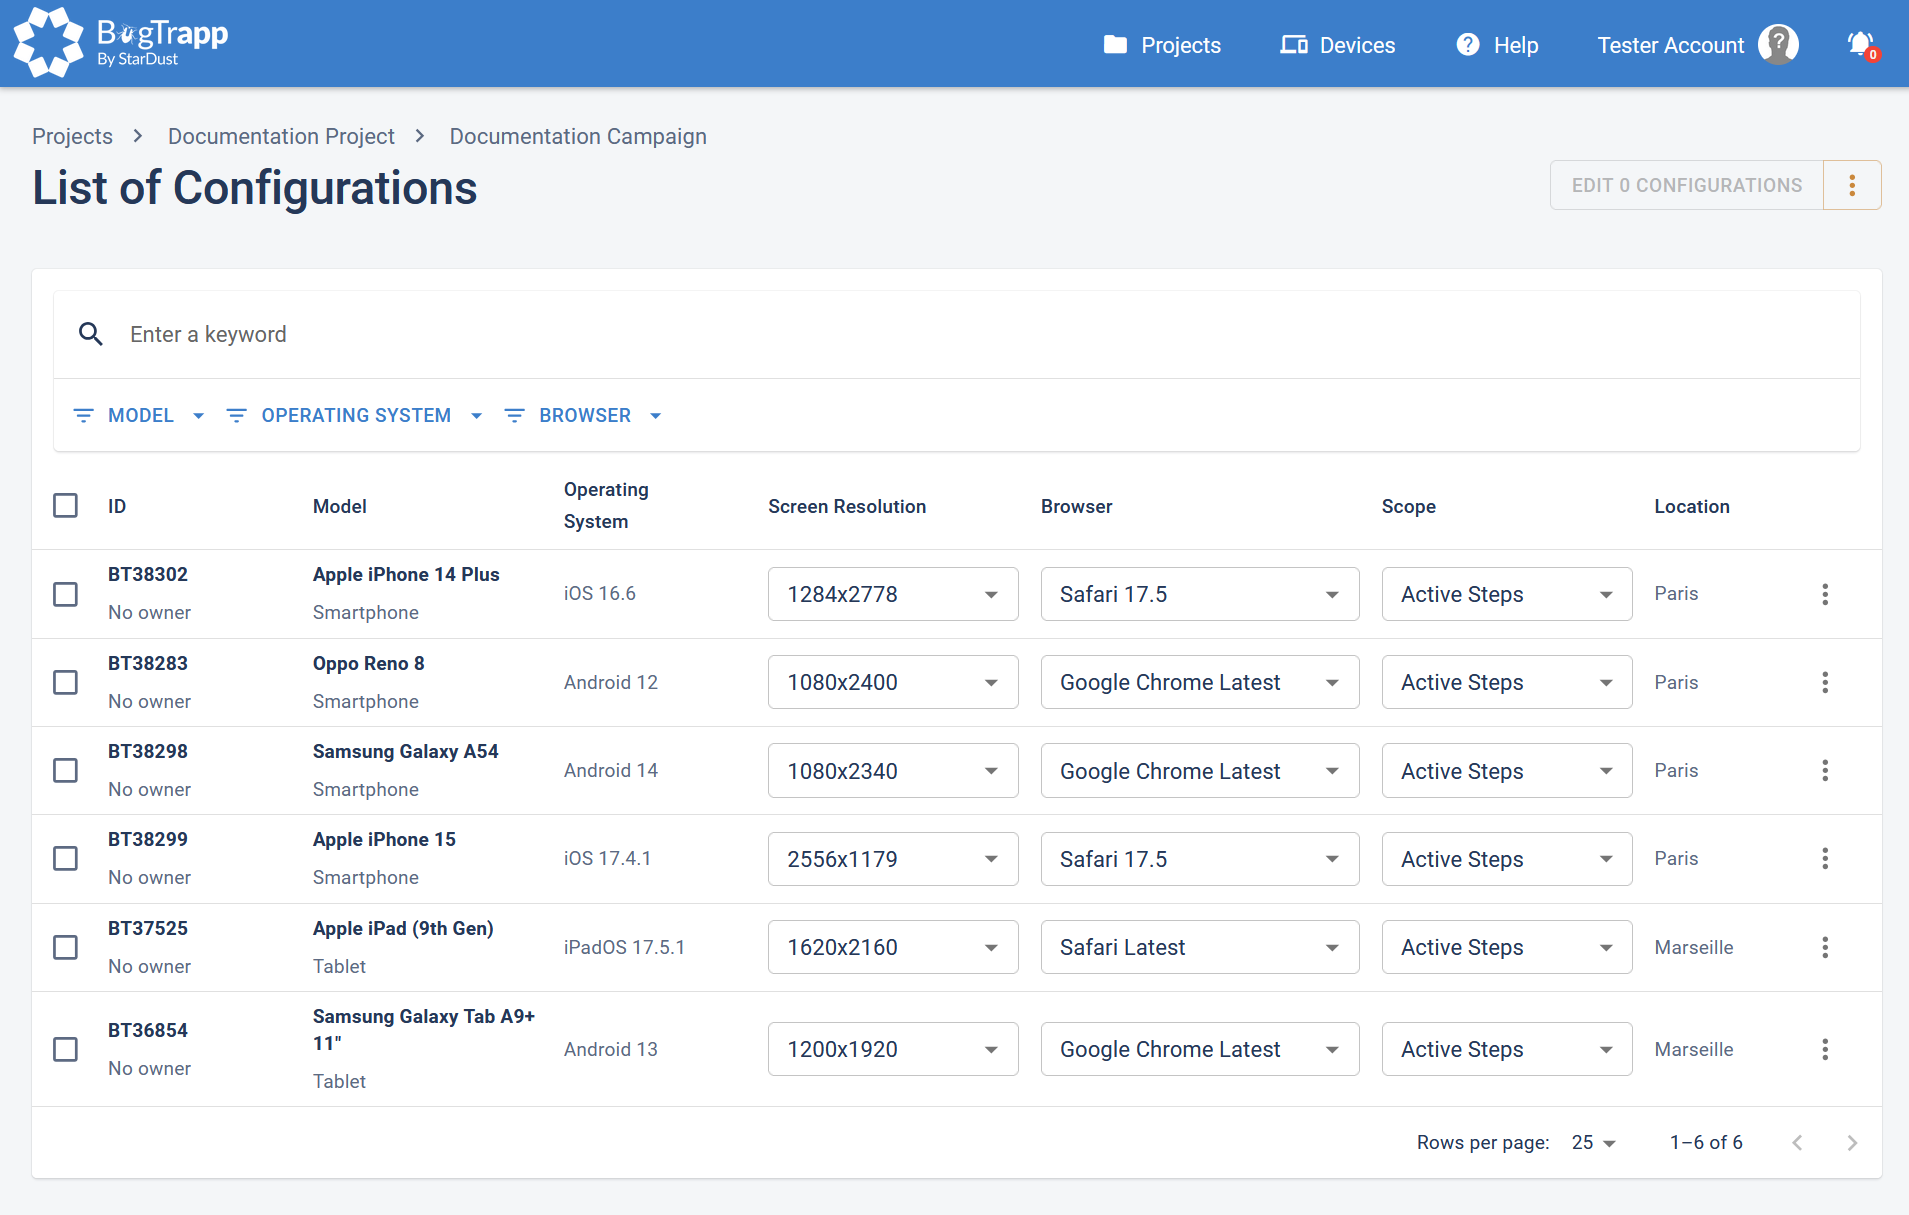
The Tester role gives you access to the following additional actions and information:
- Checkboxes to edit the scope of one or more configurations using the edit button (active as soon as a checkbox is selected).
- The scope, Screen Resolution and/or browser can also be edited line by line directly in the table, using the drop-down list on each line.
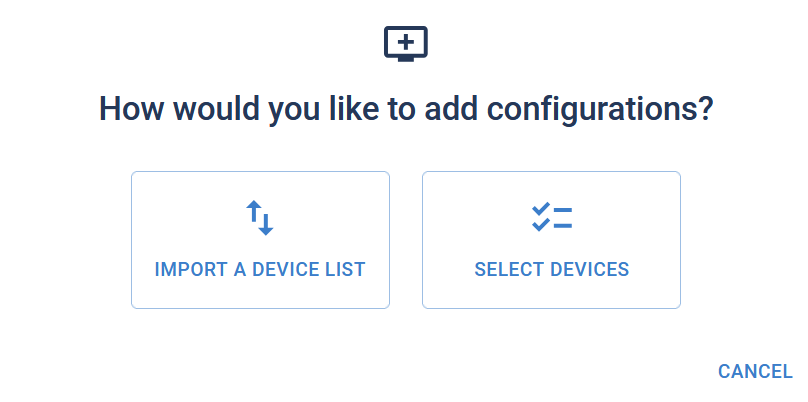
- An ADD CONFIGURATION button that open a Pop-in window giving you the choice of selecting devices from a pre-established Device List or from the Configurations/Add page (containing all the authority's devices). Click on the SELECT DEVICES button to go the Configurations/Add page, then on the ADD X DEVICE button to configure your X devices selected from the Configurations/Import page. Finally, click on the ADD CONFIGURATIONS button to return to the CONFIGURATION LIST page, with your new configurations added to the list.
¶ Issue List - All bugs
¶ As a Client
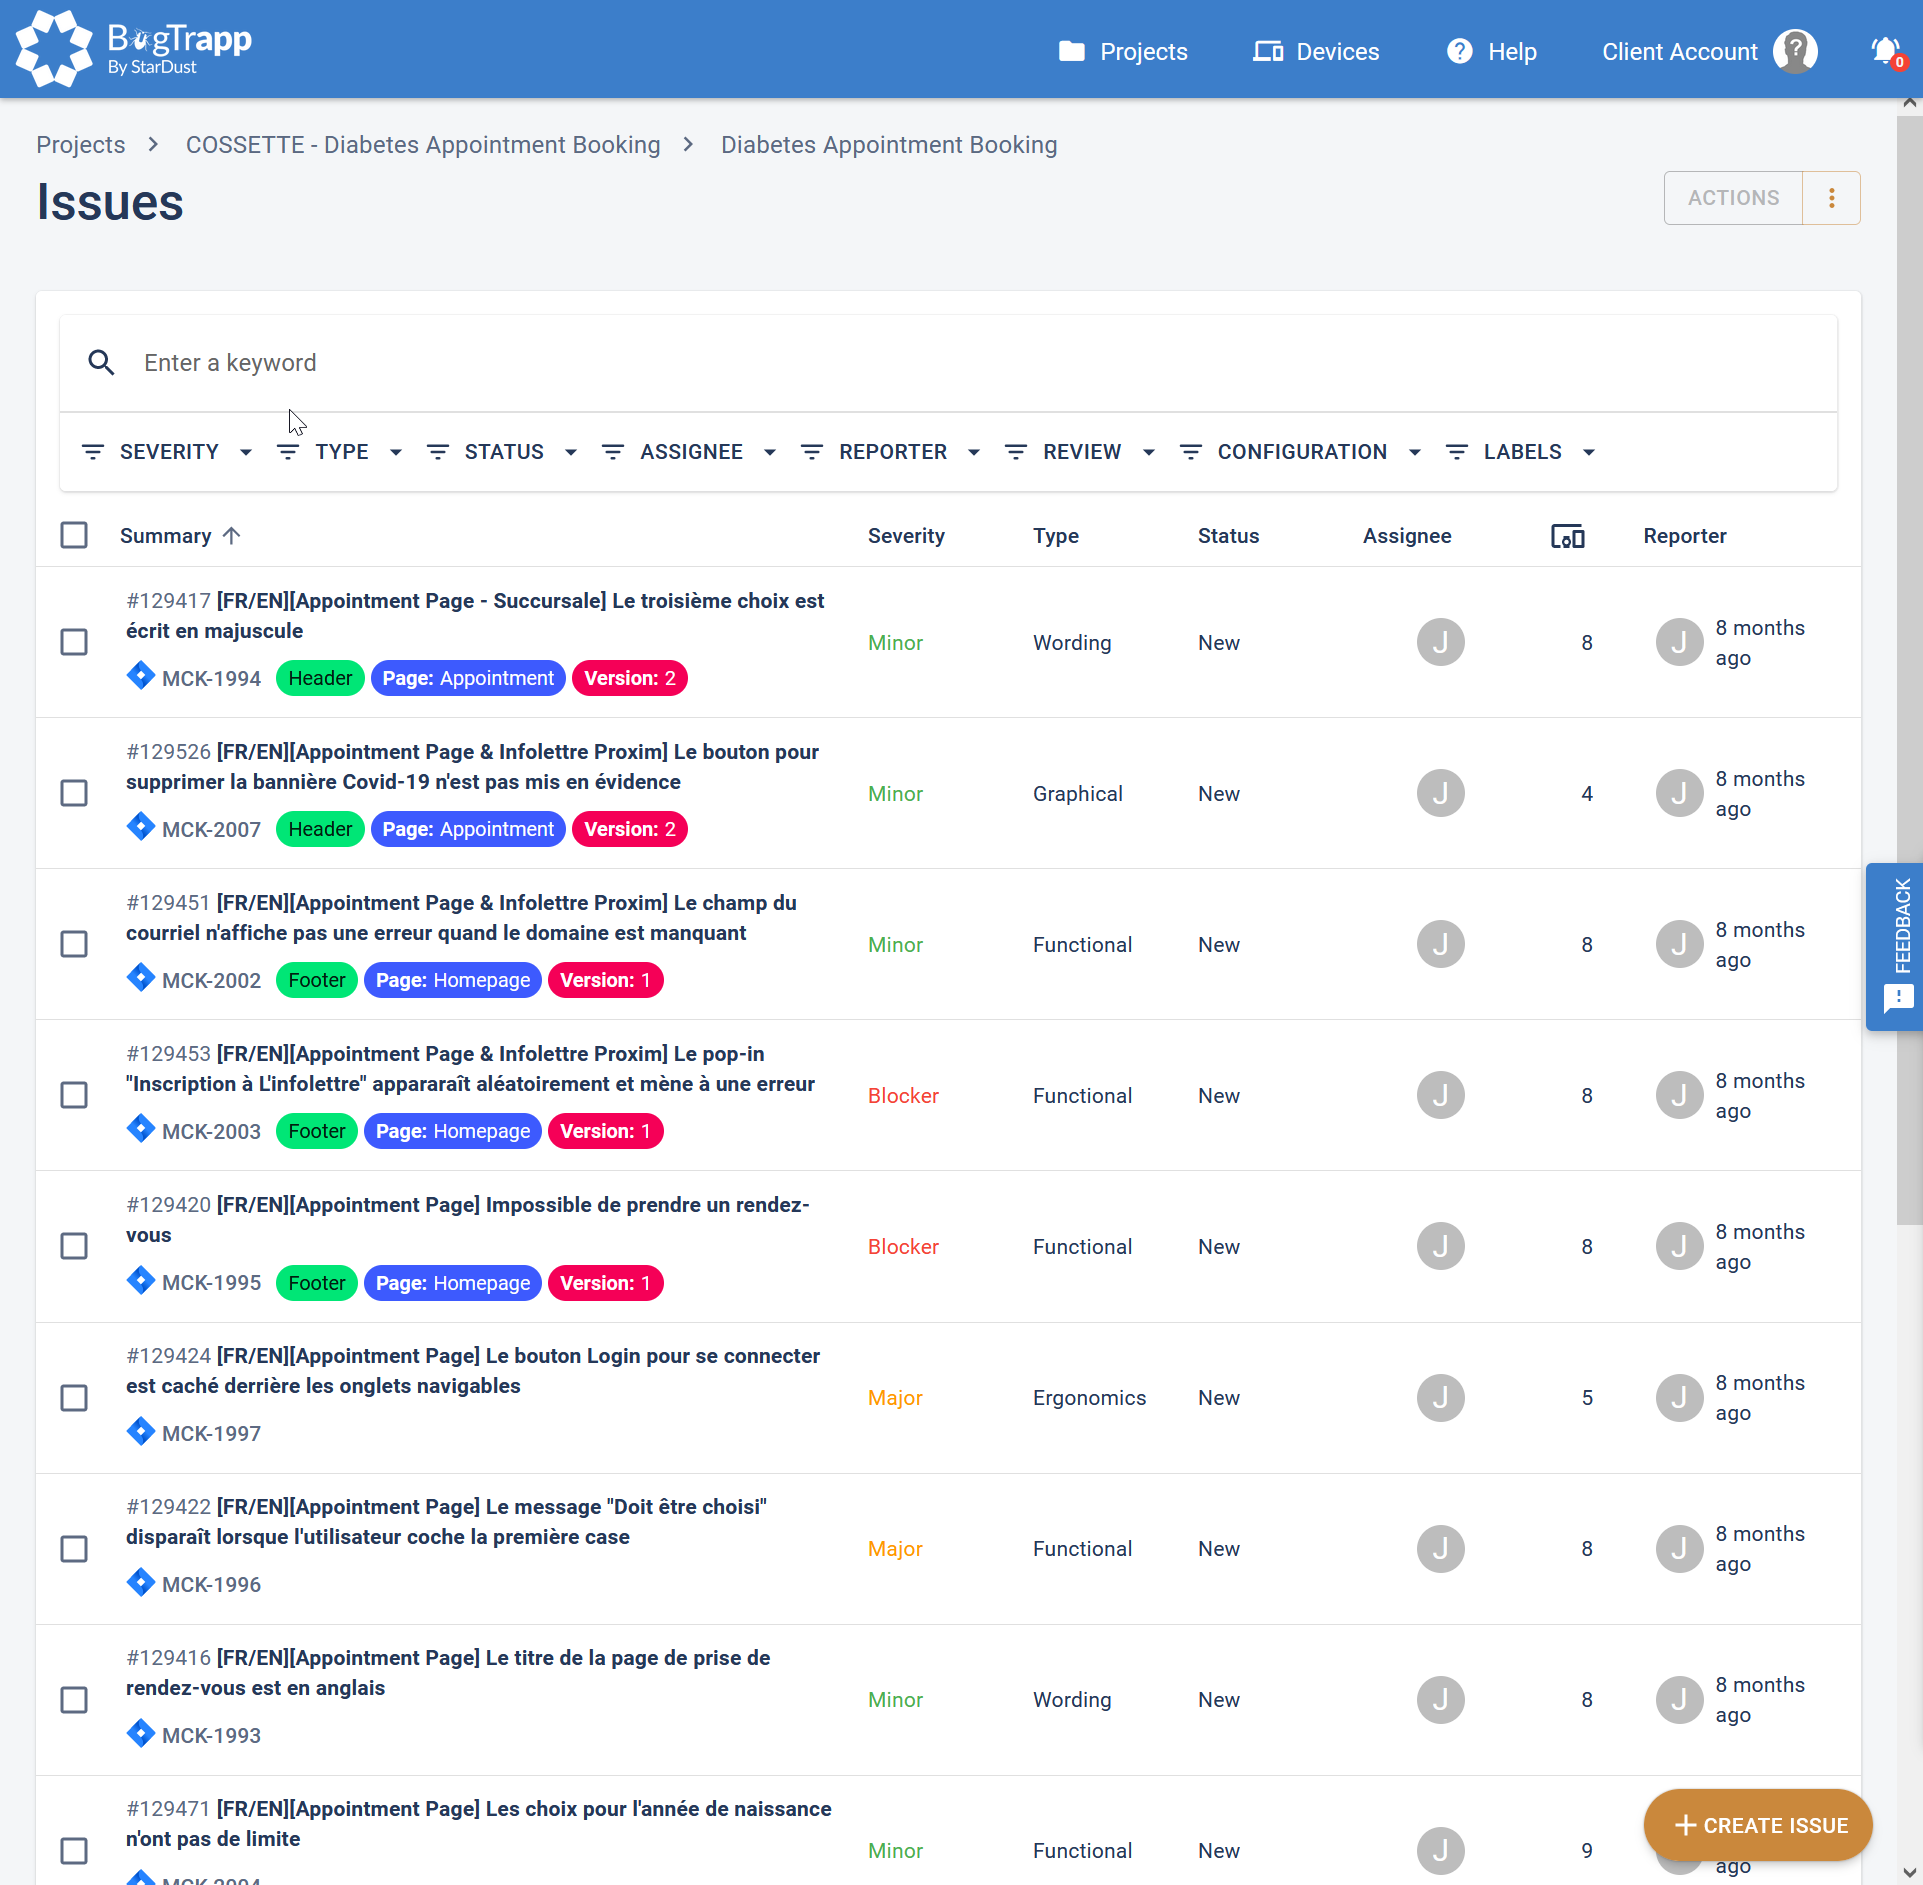
On the Issues page, you can see the list of bug tickets reported by testers.
Below, the main part of the page: the Issue List. You can filter the values displayed in the table (by type, severity etc...). You can also search the list using the search field. You can click on a column header to sort its contents in ascending/alphabetical order.
Bugs with a Status Closed and/or a Review that is not Approved are not visible.
Depending on your window resolution, you may see all or part of the following columns: Summary, Severity, Type, Status, Assignee, Devices, Reporter.
If a bug has been exported to an external bugtracker, a link to it can be clicked under the issue title.
Also under the title are the various labels attached to the Issue.
At the bottom of the table is a selector for the number of elements per page and arrows for scrolling through the table pages.
Click on the line of an issue to display its details (→ ISSUE DETAILS).
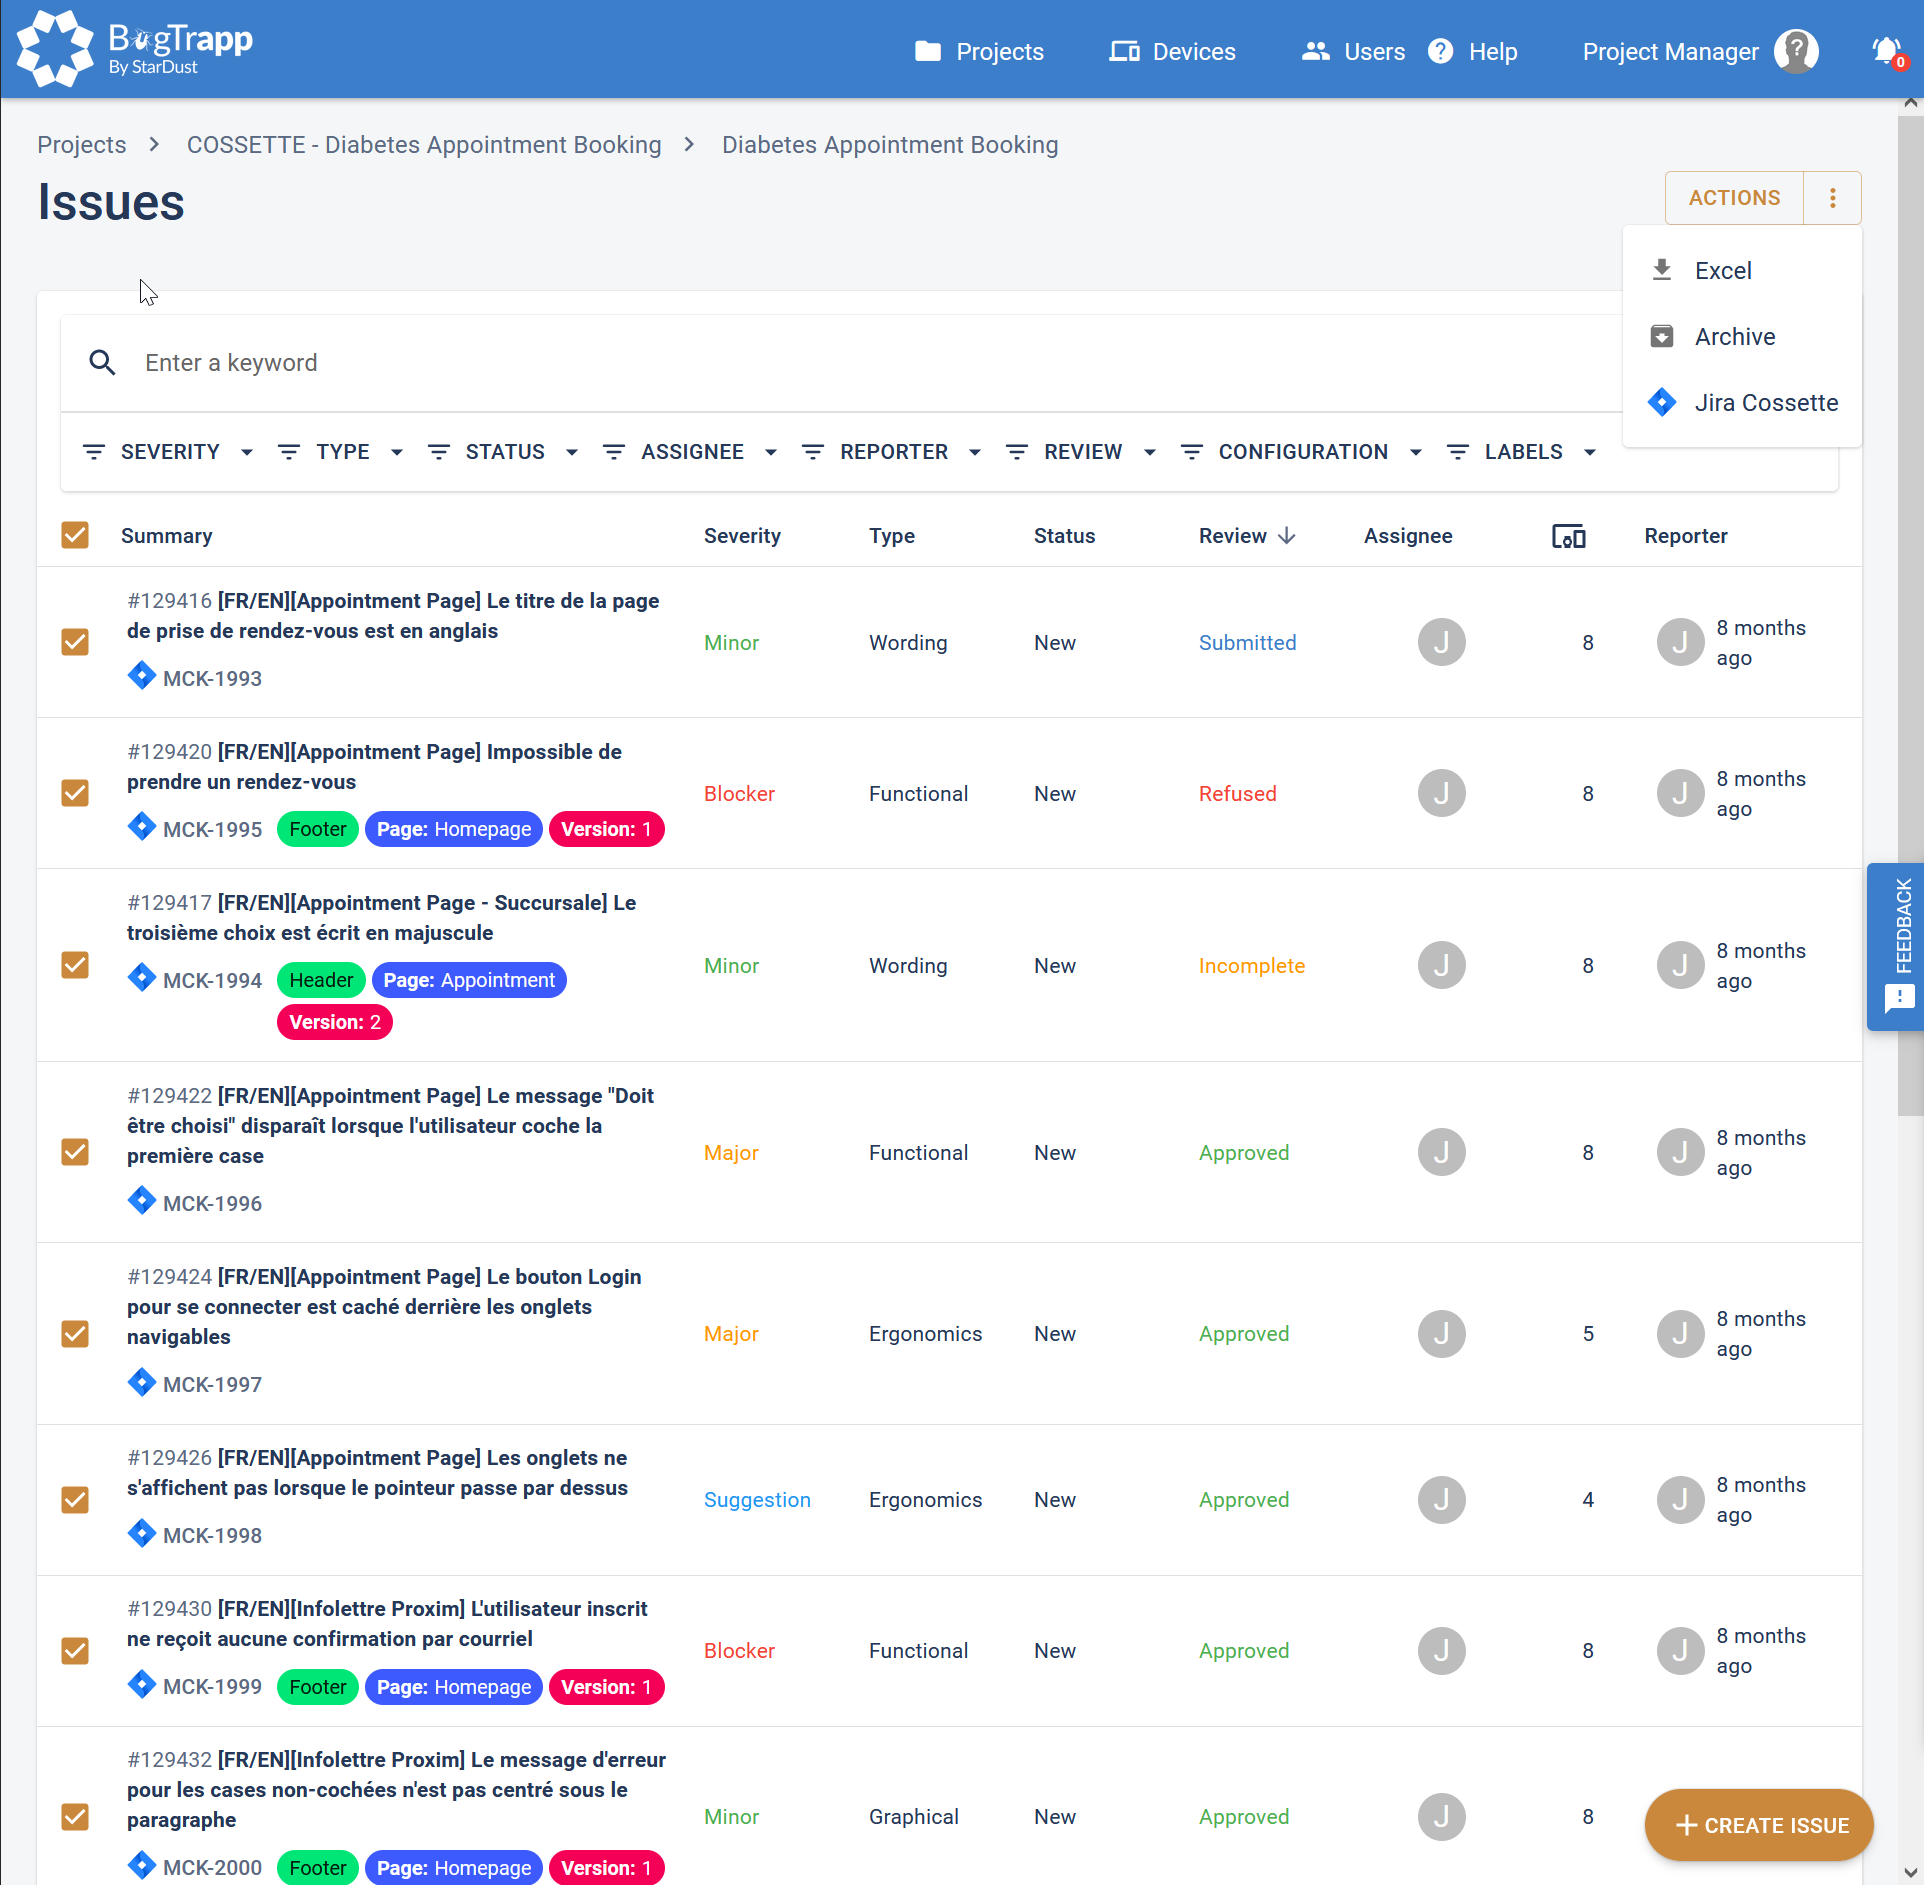
You can also take several grouped actions on bug tickets. Check the tickets concerned, then click on the ACTIONS button to open the "Edit Issues" side pane for editing grouped bugs.
In this side panel, you can view/edit the following information for the selected exits:
- Basic info for viewing only (Severity, Type)
- Basic info for editing (Status, Assignee)
- Labels
Once you've made your changes, click on the UPDATE button to apply them to the selected Issues.
To the right of the ACTIONS button is the export menu (3-dot icon), providing access to the EXCEL, ZIP Archive and client bugtracker export buttons (if a configuration to an external bugtracker has been previously set up).
- Click on the Excel button to download an Excel file containing the selected Issues.
- Click on the Archive button to download an Excel file containing the selected Issues and all associated attachments.
- Here you can see whether an export to an external Bugtracker has been configured.
To close the side panel, click on the ">" button in the top right-hand corner.
You can click on the "+ CREATE ISSUE" button to create a new Issue. A pop-in window appears, inviting you to enter the title of your new ticket. If an Issue with a similar title has already been created by a tester on this campaign, this Issue will appear as a suggestion to avoid creating duplicate Issues. Once you've entered the title, click on CREATE to display the page for creating a new Issue. (→ New Issue)
¶ As a Tester, Analyst

You can perform the following additional actions:
- In the side pane of the ACTIONS button, the Basic Infos fields (Severity, Type) can be edited.
- In the page's main table, all bugs are visible, whatever their Status or Review, and the Review column is visible.
¶ As a PM
You can perform the following additional actions:
- In the side pane of the ACTIONS button, the Review fields (Review, Review reason, Review comment) are editable
- In the export menu (3-dot icon), export to client bugtracker is active: click on the button in the external Bugtracker configuration to export the selected Issues to it.
¶ Issue Details
¶ As a Client
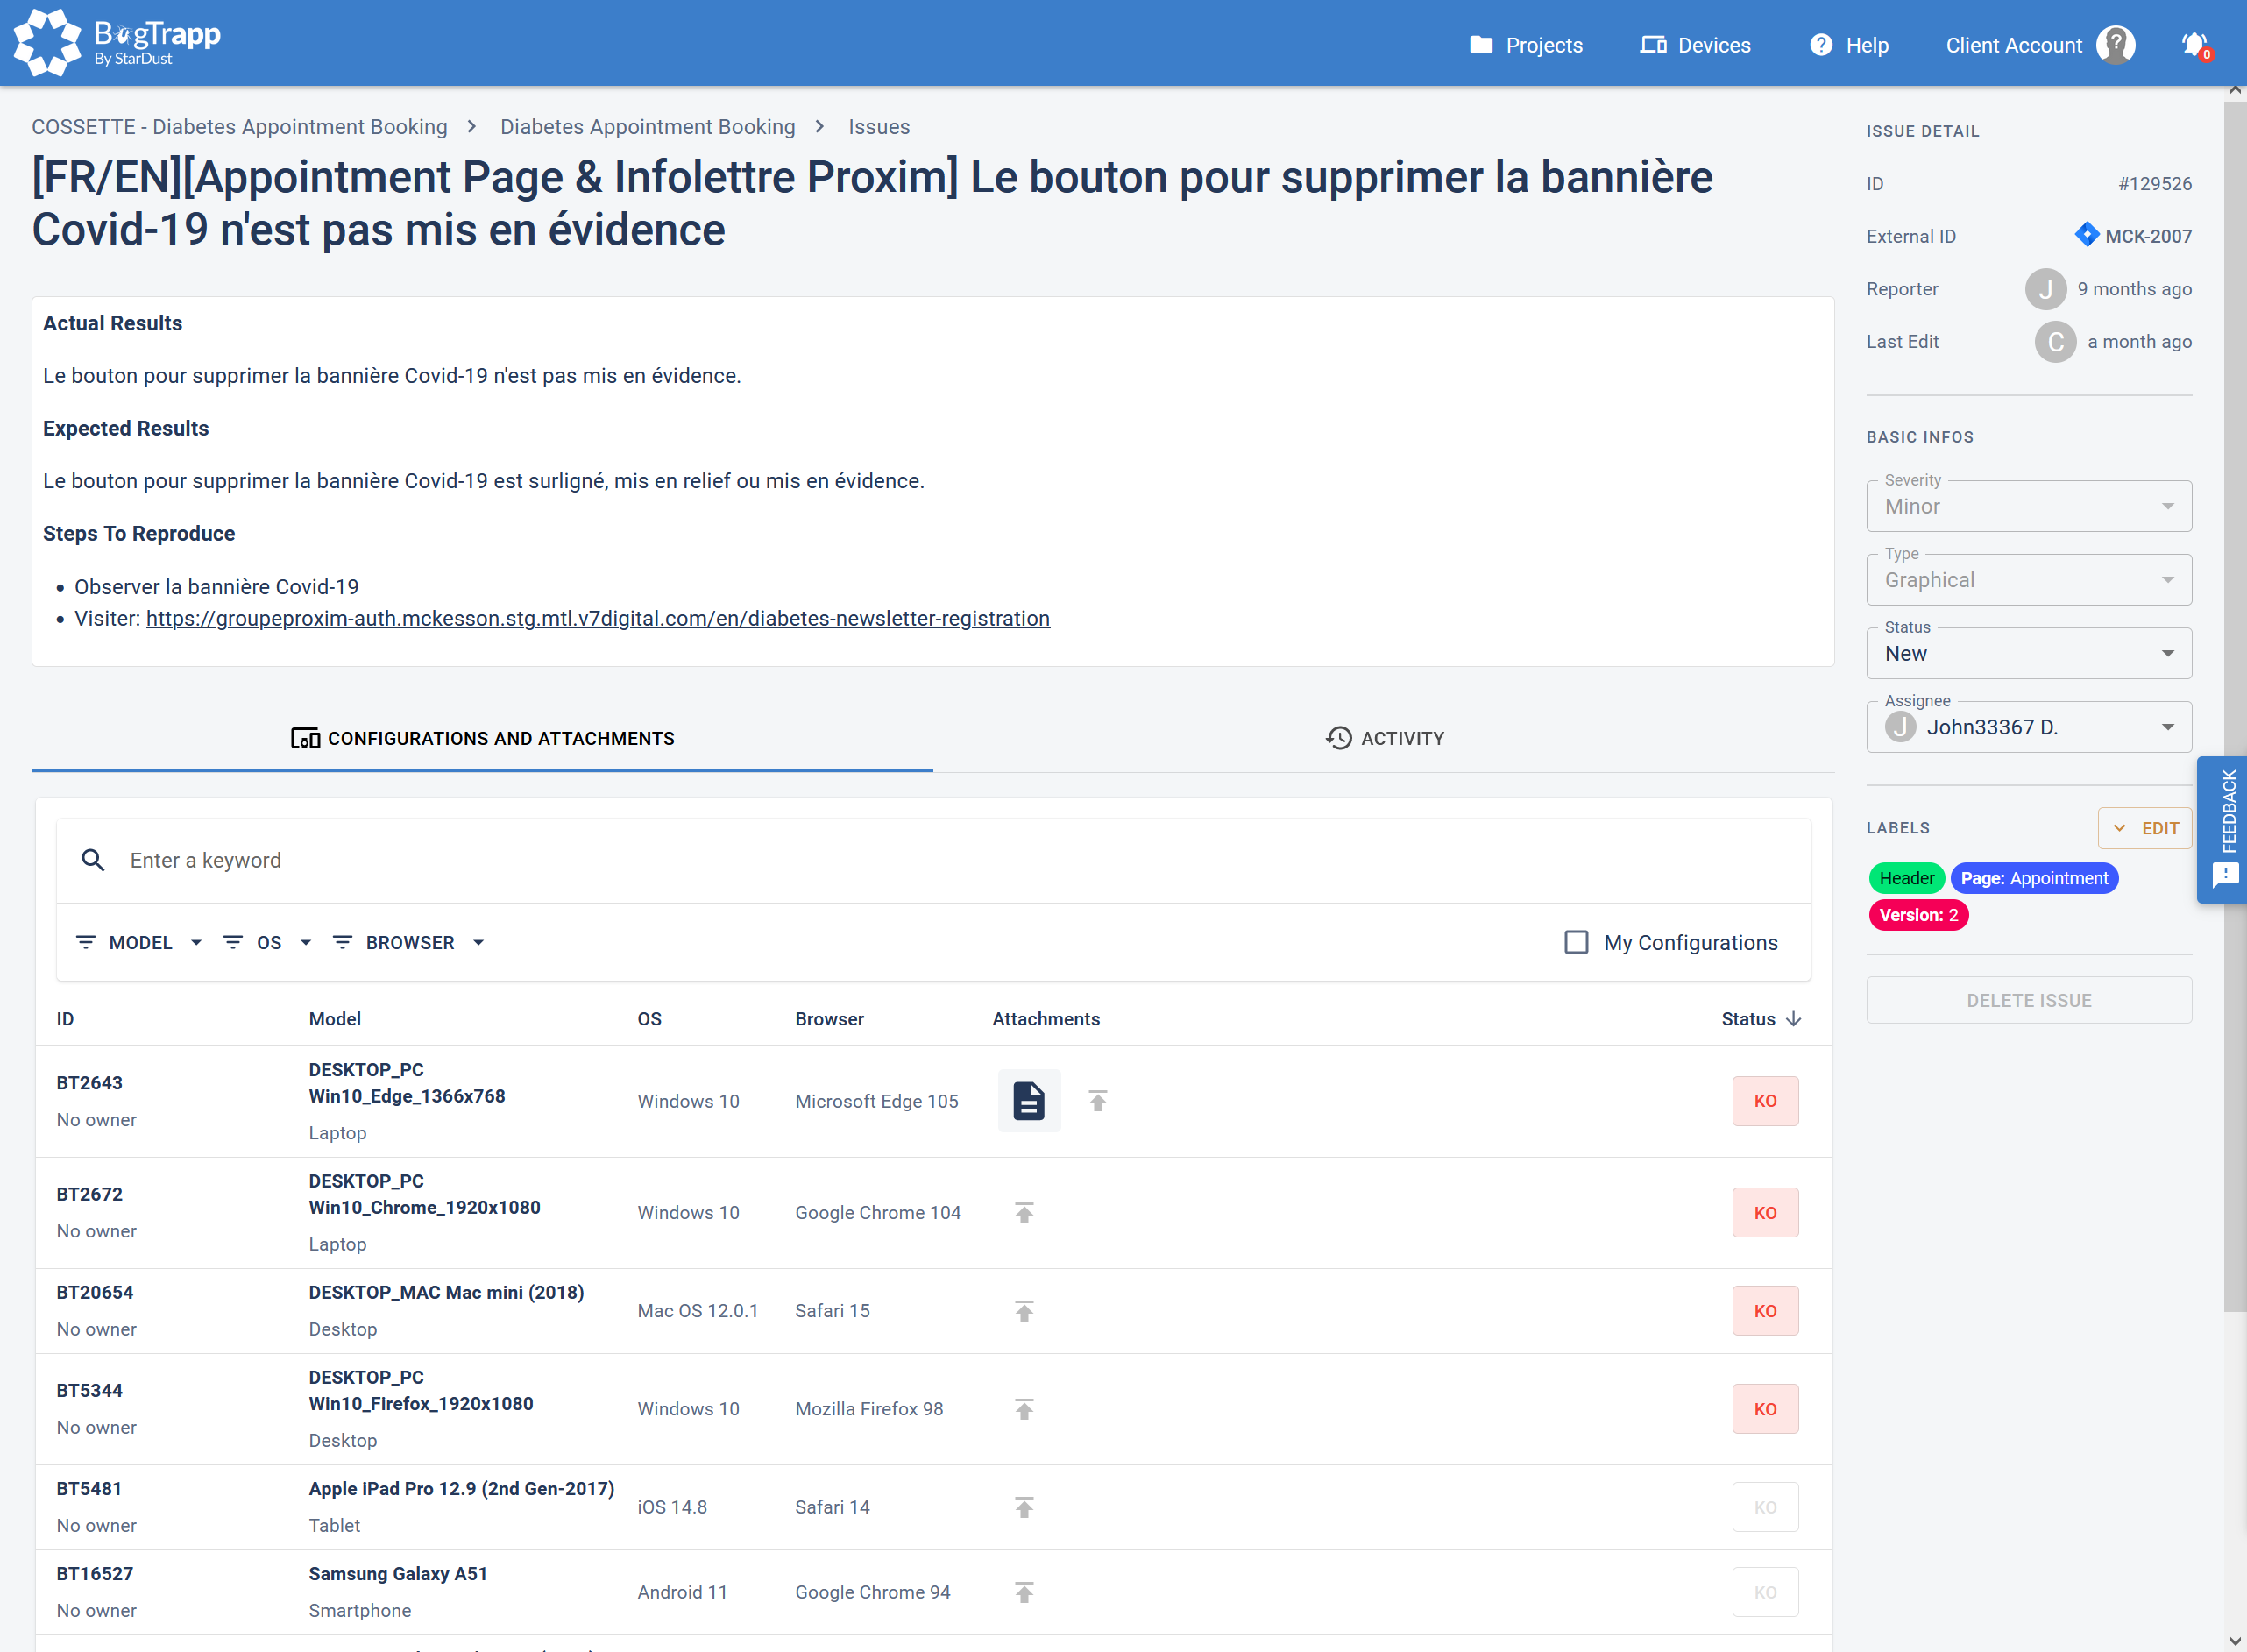
On this page, you can see the various fields (most of which cannot be modified, unless you are the author) filled in for this Issue.
Title - The title of the Issue.
Bug description - Text field generally containing Actual Results (behavior observed on the device(s) under test), Expected Results (expected results or behavior during normal operation) and Steps To Reproduce (list of steps to be taken to reproduce the bug or the same behavior observed) reported by the creator of this Issue.
BASIC INFOS - Located in the right-hand column of the window, contains the Severity and Type fields (non-modifiable) and Status and Assignee fields (modifiable). Each modification is automatically saved when the field is exited.
Labels - Allows you to select the label(s) previously created by the PM or another tester (a search field avoids duplicates if there are many labels), or to add a new label by clicking on the + Create new label button (Enter the name and choose the color associated with this new label. You can also create a family of labels, for example page::homepage, to obtain statistics grouped by family at the end of the campaign). Label selection or creation is automatically saved when the field is exited.
CONFIGURATIONS AND ATTACHMENTS - main tab of the page listing all configurations concerned by this campaign. On your configurations only, you can click on the KO button in the line of your configuration to associate it with this Issue. Finally, you can add an attachment (screenshot, crashlog etc...) by clicking on the picto in the Attachments column of your configuration's row.
ACTIVITY - secondary tab of the page listing all activities on this Issue. You can filter by All, History and Comments. You can also sort the list by recency. Finally, you can leave a comment by filling in the Leave a message field (supporting Markdown, and allowing you to mention a campaign user using the @ symbol).
¶ As a Tester, Analyst
The Tester role gives you access to the following additional actions and information:
Title - This field can be modified
Bug description - This field can be modified
BASIC INFOS
- Status: Additional statuses (Pending and Closed Hidden) are selectable.
- Severity, Type: these fields can be modified.
CONFIGURATIONS AND ATTACHMENTS
- You can add any configuration to this Issue, and add an attachment to each one.
REVIEW
- Additional tab for monitoring the Review status of this Issue (status APPROVED set by default). This tab is mainly used for Crowd Missions.
¶ As a PM
The PM role gives you access to the following additional actions and information:
REVIEW - The fields in this tab can be edited:
- Review status (SUBMITTED, INCOMPLETE, APPROVED, REFUSED)
- Review reason (mandatory for INCOMPLETE and REFUSED status) : Duplicate, Not a bug, Out of scope, Known bug, Other)
- Review comment (mandatory for INCOMPLETE and REFUSED status)
¶ New Issue
¶ As a Client
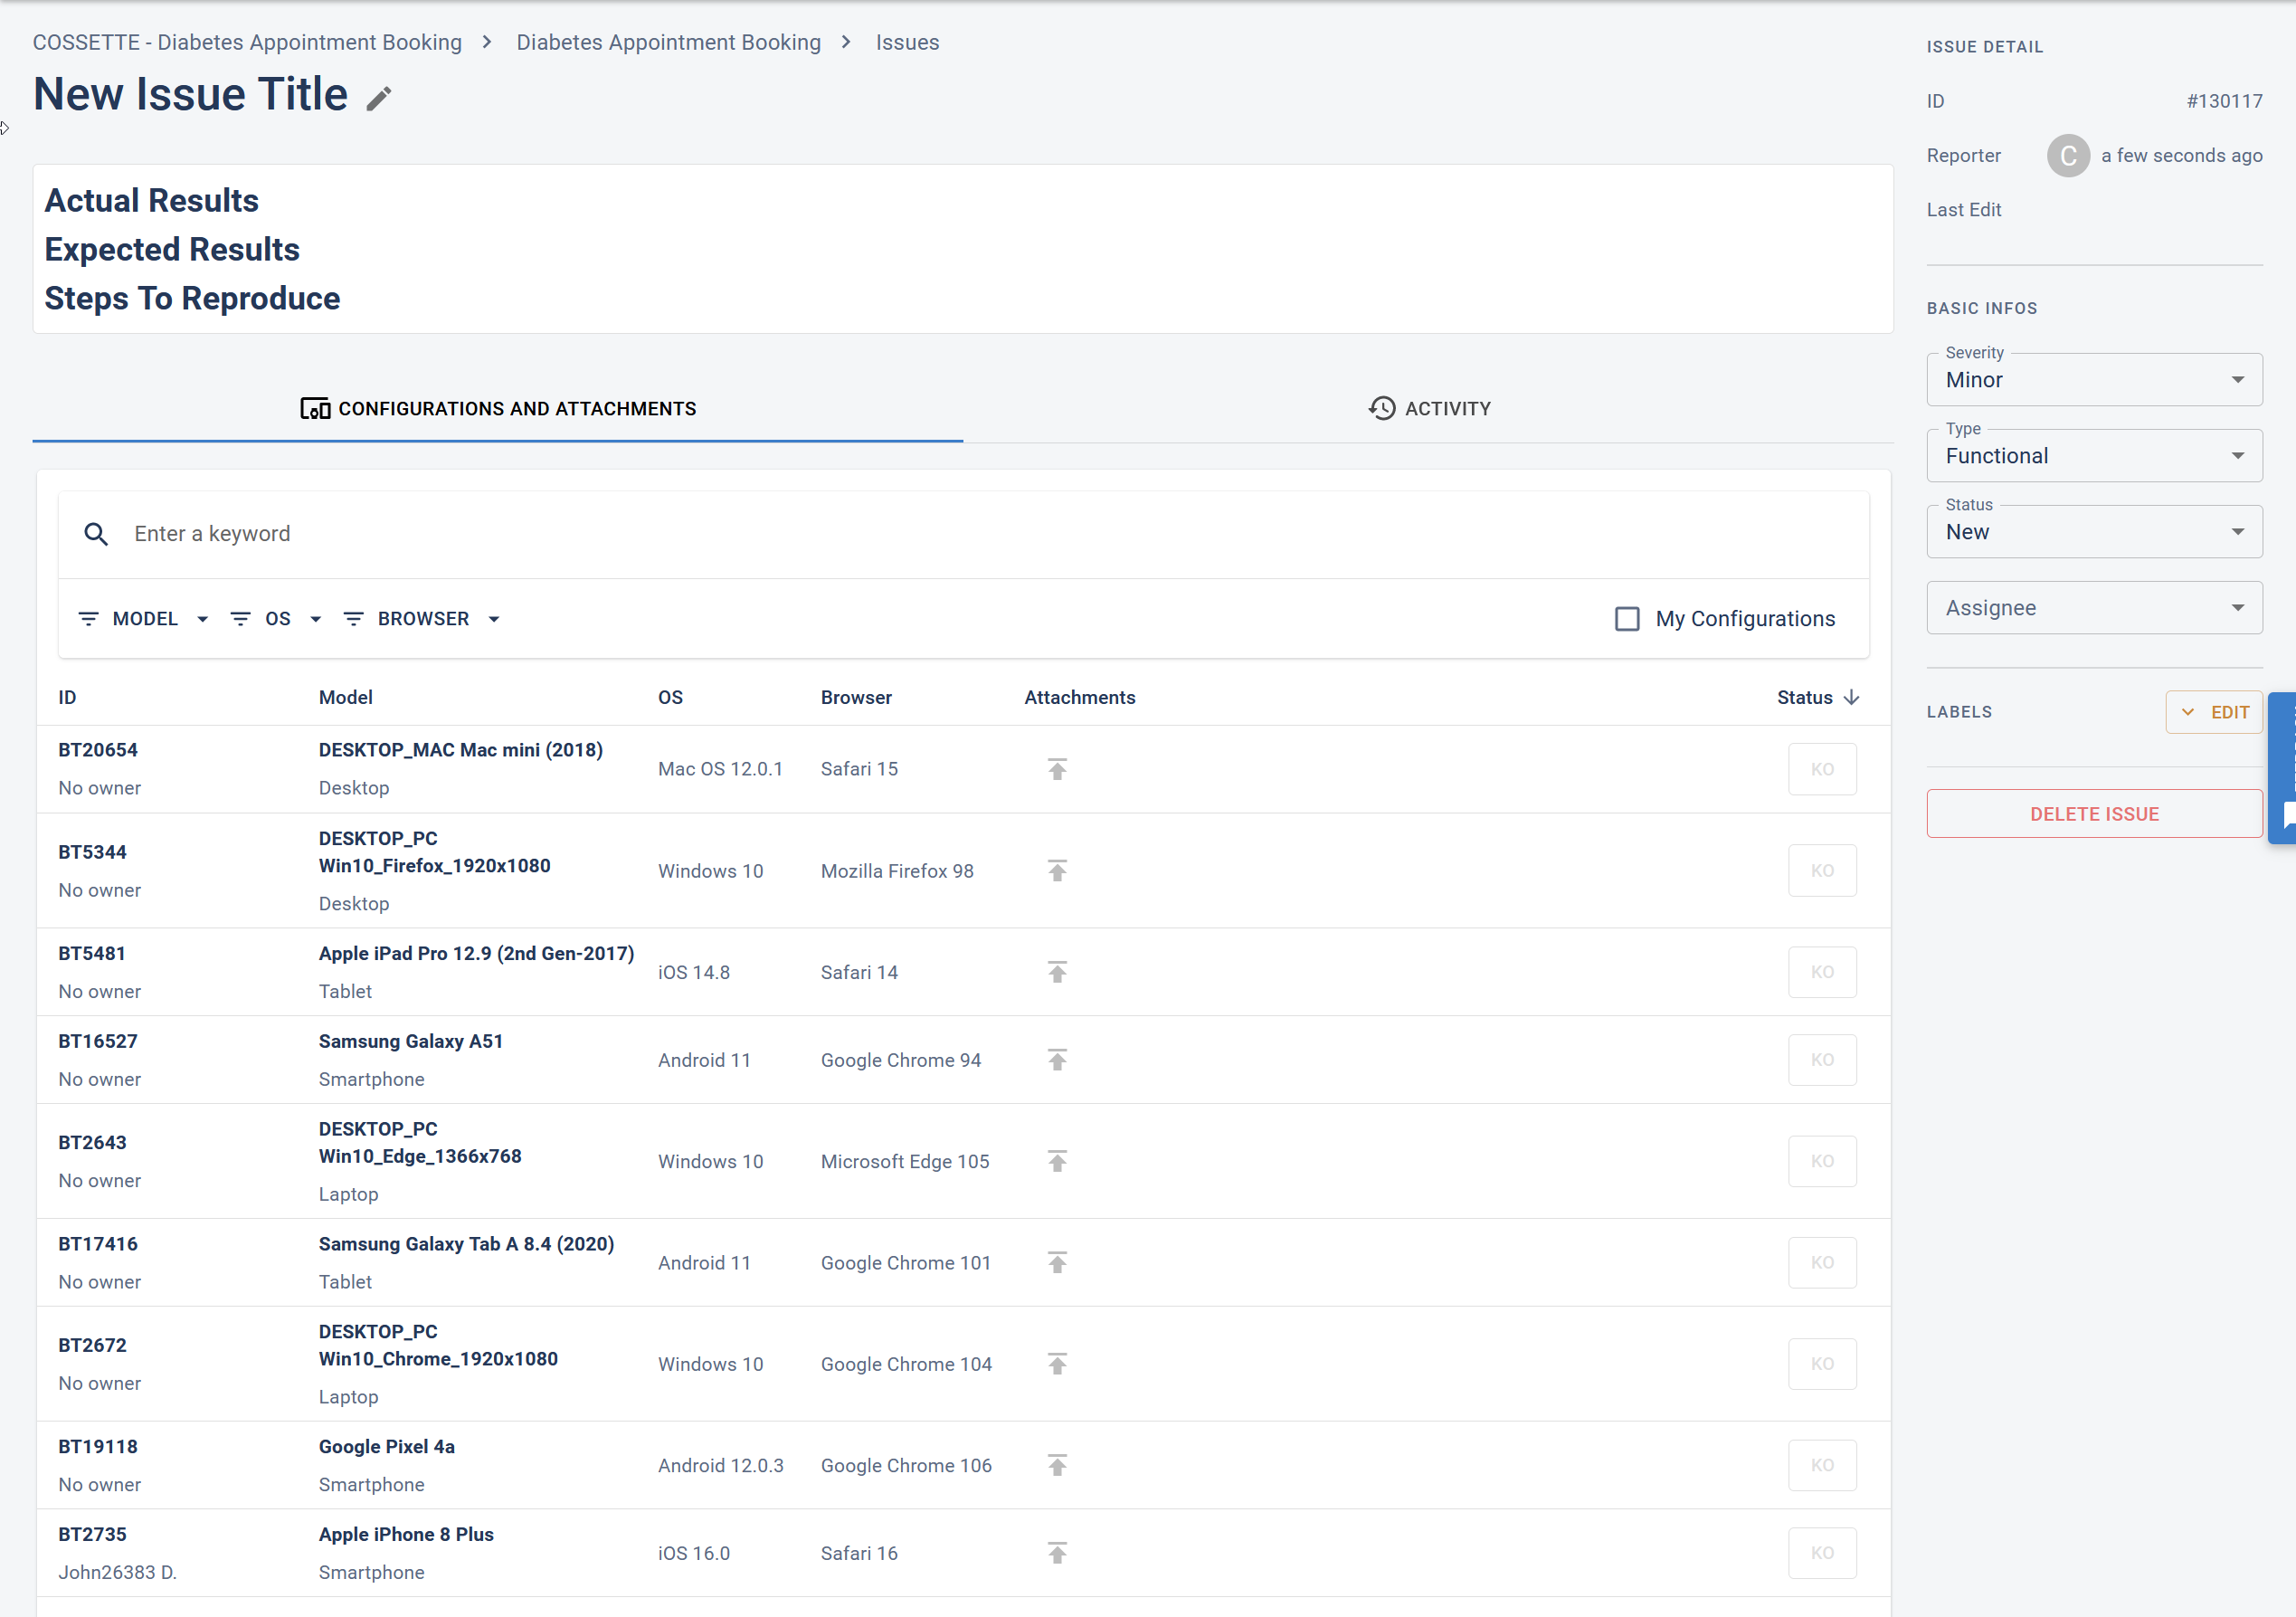
In this new window, you can see the various fields to be filled in to create this Issue.
Title - The title you've just entered. It can be edited (by clicking on the greyed-out pencil icon)
Bug description - Text field (supporting Markdown and offering shortcut buttons for formatting). Usually contains Actual Results (behavior observed on the device(s) tested), Expected Results (expected results or behavior during normal operation) and Steps To Reproduce (list of steps to be taken to reproduce the bug or the same behavior observed). Click in the field to edit the text, click on the SAVE button to save your information, or CANCEL to cancel editing.
BASIC INFOS - The Severity, Type, Status and Assignee fields in the right-hand column of the window allow you to enter the information needed to manage the Issue. Each modification is automatically saved when the field is exited.
Labels – Allows you to select the label(s) previously created by the PM or another tester (a search field avoids duplicates if there are many labels), or to add a new label by clicking on the + Create new label button (enter the name and choose the color associated with the new label). You can also create a family of labels, for example page::homepage, to obtain statistics grouped by family at the end of the campaign). Label selection or creation is automatically saved when the field is exited.
CONFIGURATIONS AND ATTACHMENTS – main tab of the page listing all configurations concerned by this campaign. On your configurations only, you can click on the KO button in the line of your configuration to associate it with this Issue. Finally, you can add an attachment (screenshot, crashlog etc...) by clicking on the picto in the Attachments column of your configuration's row.
ACTIVITY – secondary tab of the page listing all activities on this Issue. You can filter by All, History and Comments. You can also sort the list by recency. Finally, you can leave a comment by filling in the Leave a message field (supporting Markdown, and allowing you to mention a campaign user using the @ symbol). This user will receive an e-mail notification containing the comment, as well as a new notification in Bugtrapp's notification pane).
¶ As a Tester, Analyst
The Tester role gives you access to the following additional actions and information:
BASIC INFOS - Status : Additional statuses (Pending and Closed Hidden) are selectable.
CONFIGURATIONS AND ATTACHMENTS - You can add any configuration to this Issue, and add an attachment to each one.
REVIEW – additional tab to track the Review status of this Issue (default is APPROVED). This tab is mainly used for Crowd Missions.
¶ En tant que PM
The PM role gives you access to the following additional actions and information:
REVIEW – Les champs de cet onglet sont editables:
- Review status (SUBMITTED, INCOMPLETE, APPROVED, REFUSED)
- Review reason (mandatory for INCOMPLETE and REFUSED statuses) : Duplicate, Not a bug, Out of scope, Known bug, Other)
- Review comment (mandatory for INCOMPLETE and REFUSED statuses)
¶ Test Run
¶ As a Client
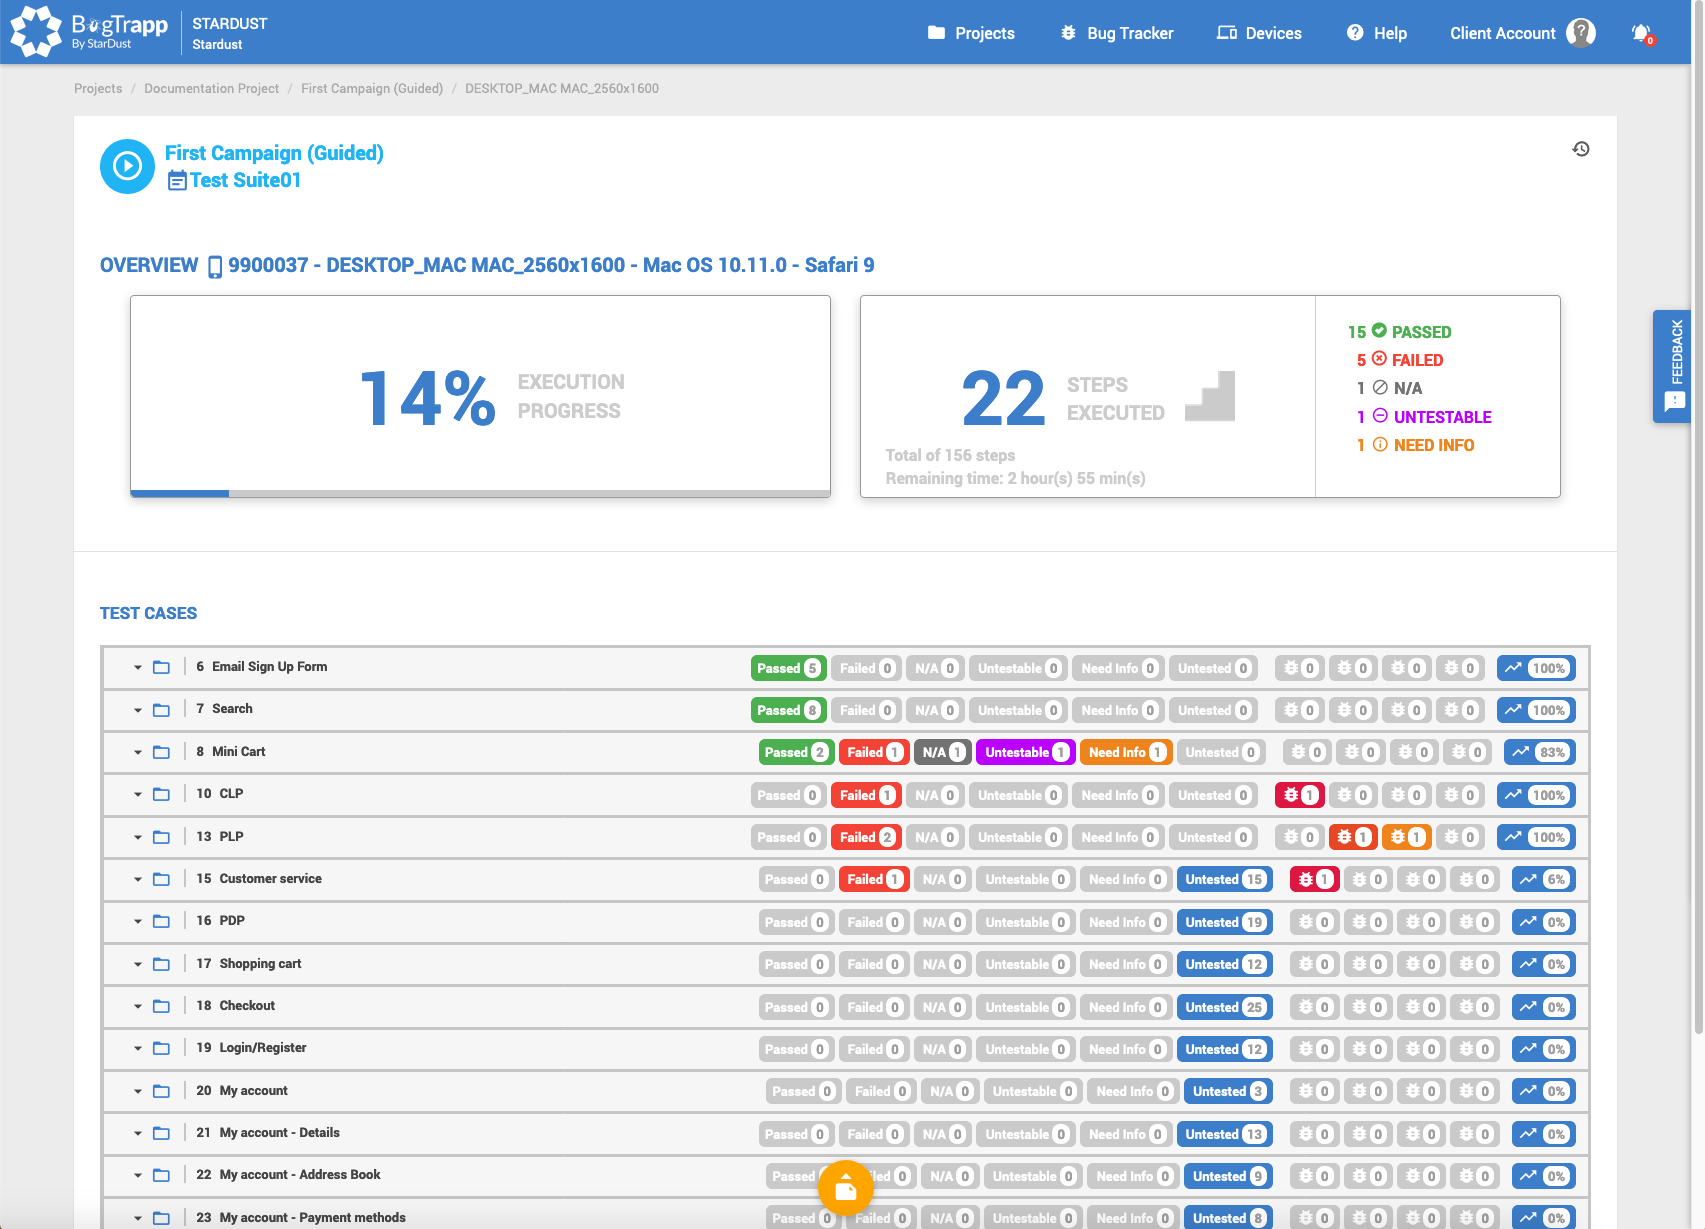
You access this page after selecting a Test Run that has already been executed from the Test Run table on the Campaign Details page.
On this page you can see the selected Test Run.
The page is composed as follows:
- Title : name of the campaign, name of the test suite used
- “Show activities” icon (opposite the title on the right) : button displaying the general "Activities & Comments" section of this Test Run
- Overview : ID, Make, Model, OS, OS Version, Browser, Browser Version of the device used on this Test Run
- Box 1: Percentage of progress in the execution of this Test Run
- Box 2: Number of steps executed, total number of steps to be executed on this Test Run, approximate time remaining to execute all the remaining steps, possible statuses of the steps and number of accumulated steps of the Test Run in front of each of these statuses.
- Test Cases : Sets of Test Cases to be executed on this Test Run, with for each one: its ID, its title, the possible statuses of the steps and the number of cumulated steps in the Test Case in front of each one of these statuses, criticality of the possible bugs and number of cumulated bugs of the Test Case in front of each one of these criticalities, percentage of progress of the Test Case. When unfolding a Test Case, all the steps composing it are displayed below it, with for each one: its ID, its Test Description, its Expected Result, its attachments, its status, and the date, time and name of the person who performed the Last update of this step. To see the possible bug tickets attached to a step, click on the Play button at the beginning of the step so that BugTrapp loads the bug(s). Please note the presence of the 2 inserts above the bugs (and functioning as tabs): ALL and THIS. ALL (displayed by default) gathers all the bugs listed on the current stage whatever the device, THIS gathers all the bugs reported on this stage, and only on the device under test.
¶ As a Tester, Analyst, PM
You access this page after clicking on Start Testing from the Campaign Details page.
Thus the Test role gives you access to the following additional information and actions:
- Test Cases: By unfolding a Test Case, at each step after clicking on the Play button: its Test Description with an Add Note button (opening a Pop-in window containing a text field for leaving a note), its status (editable). To report a bug on the current step, click on the + CREATE ISSUE button (opens the New Issue page → New Issue). Once the bug has been documented and saved, the status of the step changes to "Failed" automatically. You can also link an already existing bug by clicking the LINK EXISTING BUG button. A Pop-in window will then open asking you to search for the bug (with drop-down lists on the Test Case then Bug ID). Once selected, click on the SAVE button to close the Pop-in and add the bug to the current step.
In the possible actions on each bug, you can :- Click on the +/- button to add/remove your device to one of the bugs listed on this step.
- Click on the Clone bug button to create a new bug already pre-filled with the information of the cloned bug.